Rate Tutorial
This tutorial will show you how to find patterns for Brickstitch Alphas, how to create patterns for Brickstitch Alphas, and how to read and knot Brickstitch Alphas.
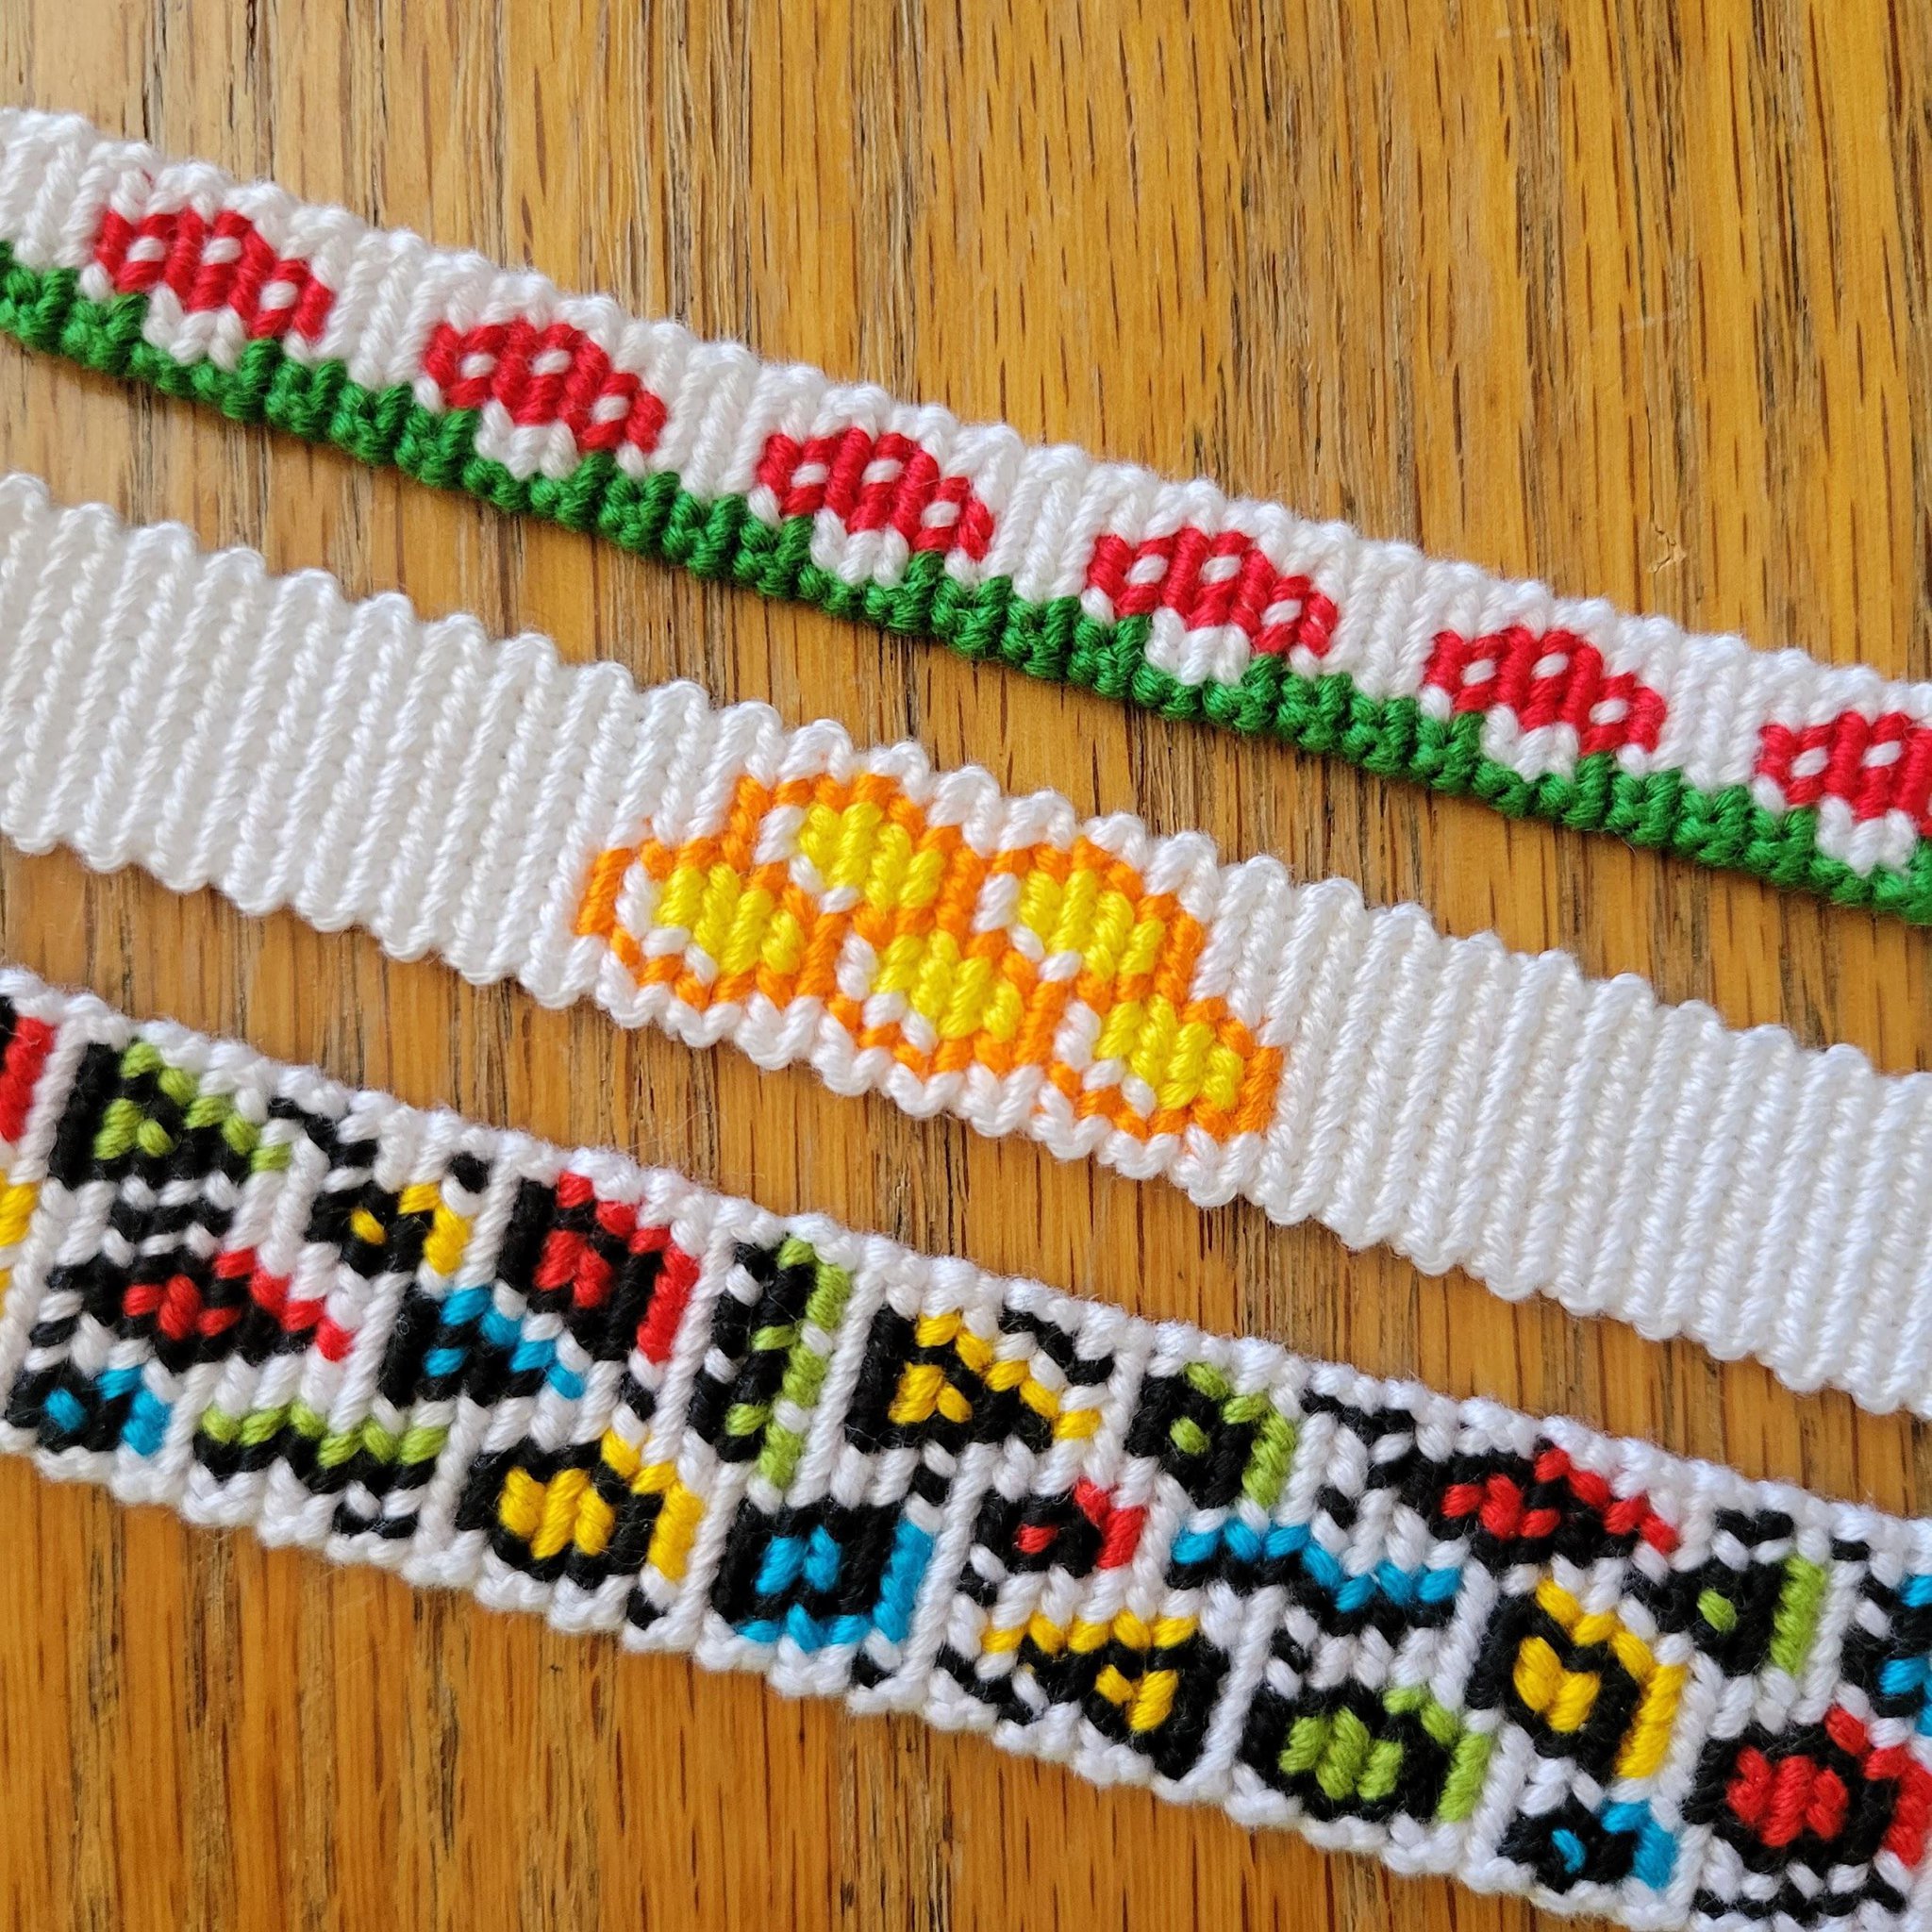
All of the patterns shown in the thumbnail for this tutorial are my original designs, and can be found on my Instagram, claires_wears_spam. They’re posted on my Fav Patterns saved story.
All of the patterns shown in the thumbnail for this tutorial are my original designs, and can be found on my Instagram, claires_wears_spam. They’re posted on my Fav Patterns saved story.
How to Find Patterns for Brickstitch Alphas
There are many websites where you can find patterns to use with this technique. The best way to find patterns is to find dedicated beading websites, or use beading terms to search for patterns on larger platforms (like Pinterest or Instagram). I recommend using terms like beadweaving, brickstitch, and peyote and peyote stitch to find patterns. You can also buy patterns from places like Etsy.
One thing you need to be very careful about is selling what you make with the patterns you find. Pattern creators usually state somewhere on their platform whether or not they’re okay with people selling whatever they make with their patterns. If you’re unsure, ask, and if you can’t find an answer, don’t sell them. One website I use to find patterns I know I can use to make things I can sell is https://brickstitchbeadpatterns.blogspot.com/p/home.html. You’re free to sell anything you make with their patterns, unless otherwise noted. I also post patterns I create on my Instagram, claires_wears_spam. They can be found on my Fav Patterns saved story. You are free to use these patterns and sell whatever you make with them.
One thing you need to be very careful about is selling what you make with the patterns you find. Pattern creators usually state somewhere on their platform whether or not they’re okay with people selling whatever they make with their patterns. If you’re unsure, ask, and if you can’t find an answer, don’t sell them. One website I use to find patterns I know I can use to make things I can sell is https://brickstitchbeadpatterns.blogspot.com/p/home.html. You’re free to sell anything you make with their patterns, unless otherwise noted. I also post patterns I create on my Instagram, claires_wears_spam. They can be found on my Fav Patterns saved story. You are free to use these patterns and sell whatever you make with them.
How to Create Patterns for Brickstitch Alphas
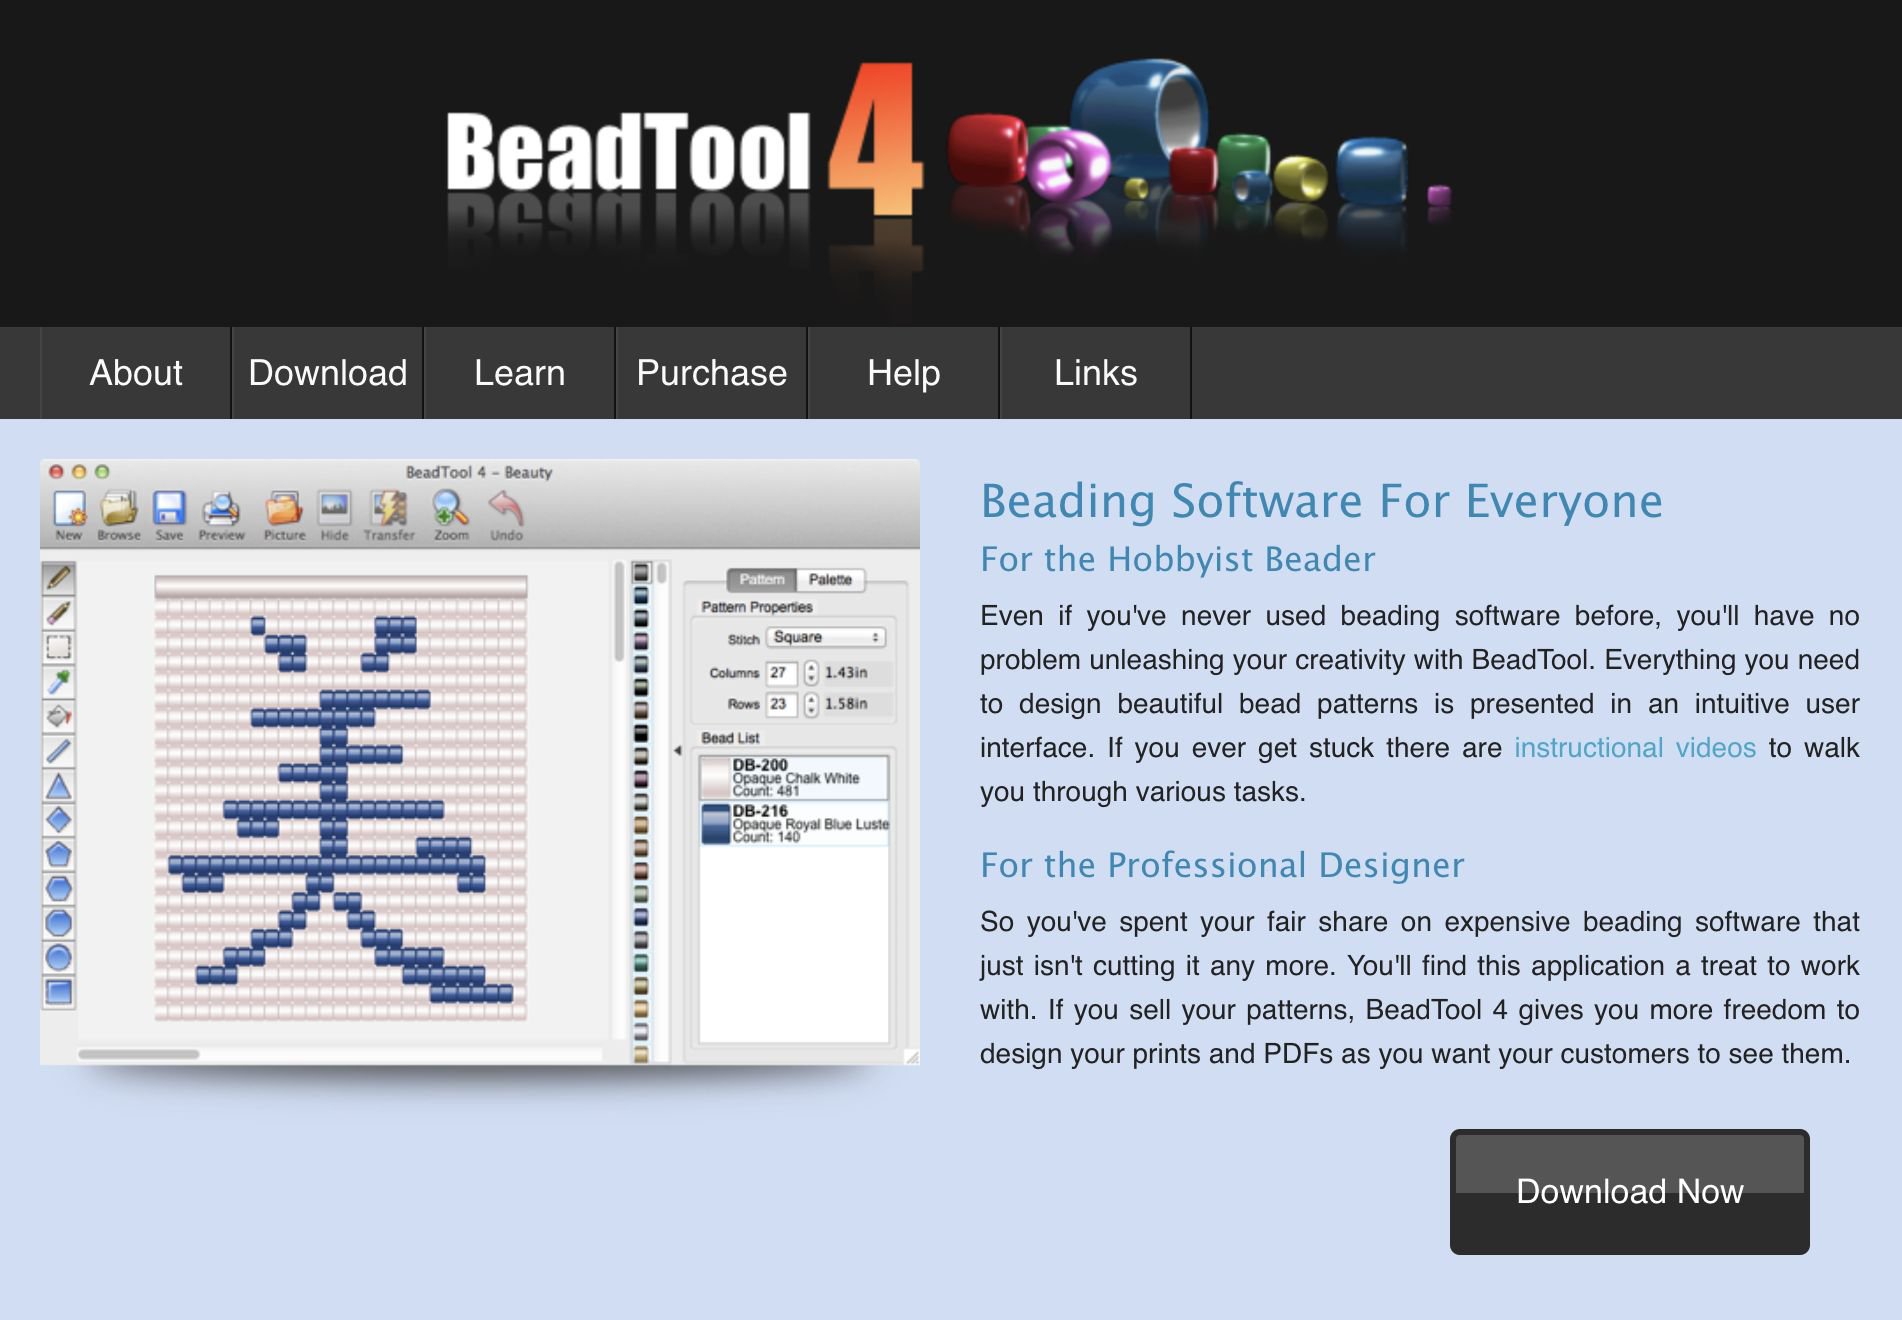
One of the best ways to create patterns for Brickstitch Alphas is to use BeadTool 4. You can download it from their website with limited features for free. You can learn more about how to use it by clicking on the “Learn” tab of their website. I will not be giving a detailed tutorial of how to use the generator, as it’s explained well on the website.
https://www.beadtool.net/about.html
https://www.beadtool.net/about.html
While this pattern generator is pretty intuitive to use, a few features must be explained in the context of Brickstitch Alpha bracelets (as this generator was originally intended to be used for beaded bracelets).
For the stitch tab in the generator, choose the “Brick” option.
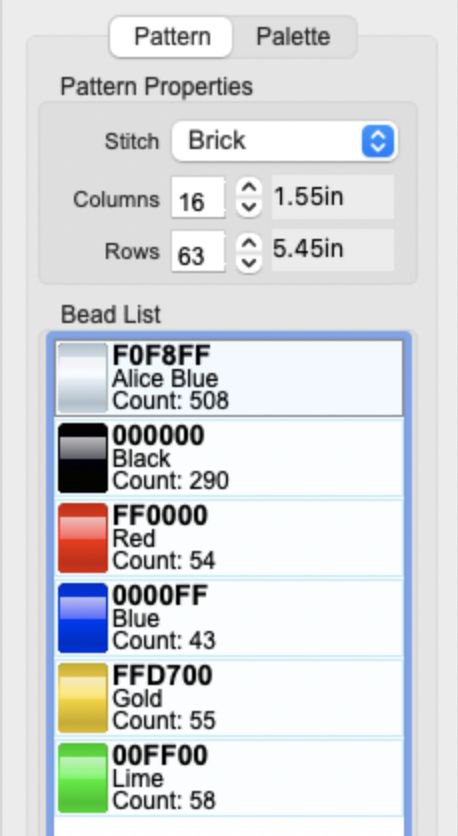
The columns tab corresponds to how many knots are in each row of your bracelet. You can change this to whatever number you would like. The more columns you have, the wider your bracelet.
The rows tab corresponds to how many rows are in your bracelet. Brickstitch Alphas tend to knot up to be more stretched out than regular Alphas, so I recommend making this number less than the amount of rows you use for a regular Alpha. For context, I use about 70 rows for my regular Alphas and about 63 rows for my Brickstitch Alphas. You may have to use more or less than me depending on your wrist size and knot tension. I make my bracelets long enough to fit my five inch wrist, and I have medium knot tension.
The inch measurements next to the columns and rows can be disregarded.
The bead list shows what colors you’ve used, and the count shows how many knots of each color you have.
For the stitch tab in the generator, choose the “Brick” option.
The columns tab corresponds to how many knots are in each row of your bracelet. You can change this to whatever number you would like. The more columns you have, the wider your bracelet.
The rows tab corresponds to how many rows are in your bracelet. Brickstitch Alphas tend to knot up to be more stretched out than regular Alphas, so I recommend making this number less than the amount of rows you use for a regular Alpha. For context, I use about 70 rows for my regular Alphas and about 63 rows for my Brickstitch Alphas. You may have to use more or less than me depending on your wrist size and knot tension. I make my bracelets long enough to fit my five inch wrist, and I have medium knot tension.
The inch measurements next to the columns and rows can be disregarded.
The bead list shows what colors you’ve used, and the count shows how many knots of each color you have.

Clicking on the Palette tab allows you to choose the colors you use in your pattern. The tab underneath allows you to choose from different subsets of colors. These correspond to different brands of beads, which you don’t need to worry about. You can choose and use whatever colors you want. I personally find the generic colors the easiest to use.

The main portion of the generator is your pattern. You can draw on whatever pattern you would like. I save my patterns by screenshotting them and saving the screenshot to my computer.
Note that when you actually knot whatever design you create, it will end up looking more stretched out than it does in the pattern.
Note that when you actually knot whatever design you create, it will end up looking more stretched out than it does in the pattern.

How to Read and Knot Brickstitch Alphas
First, you need to figure out how much string to cut for your bracelet. I use base threads that are half the thickness of regular threads. You can achieve this by splitting your threads in half (if possible), or just buying thinner threads. I used DMC Cotton Pearl size 8 for my base threads, and regular 6-stranded embroidery floss for my knotting threads.
You need to cut double the base threads as knots per row, minus one base thread. You can use this formula to find the amount of base threads you need:
(number of knots per row x 2) - 1 = number of base threads
For this bracelet, I had 31 base threads, as (16 x 2) - 1 = 31.
You need to cut double the base threads as knots per row, minus one base thread. You can use this formula to find the amount of base threads you need:
(number of knots per row x 2) - 1 = number of base threads
For this bracelet, I had 31 base threads, as (16 x 2) - 1 = 31.

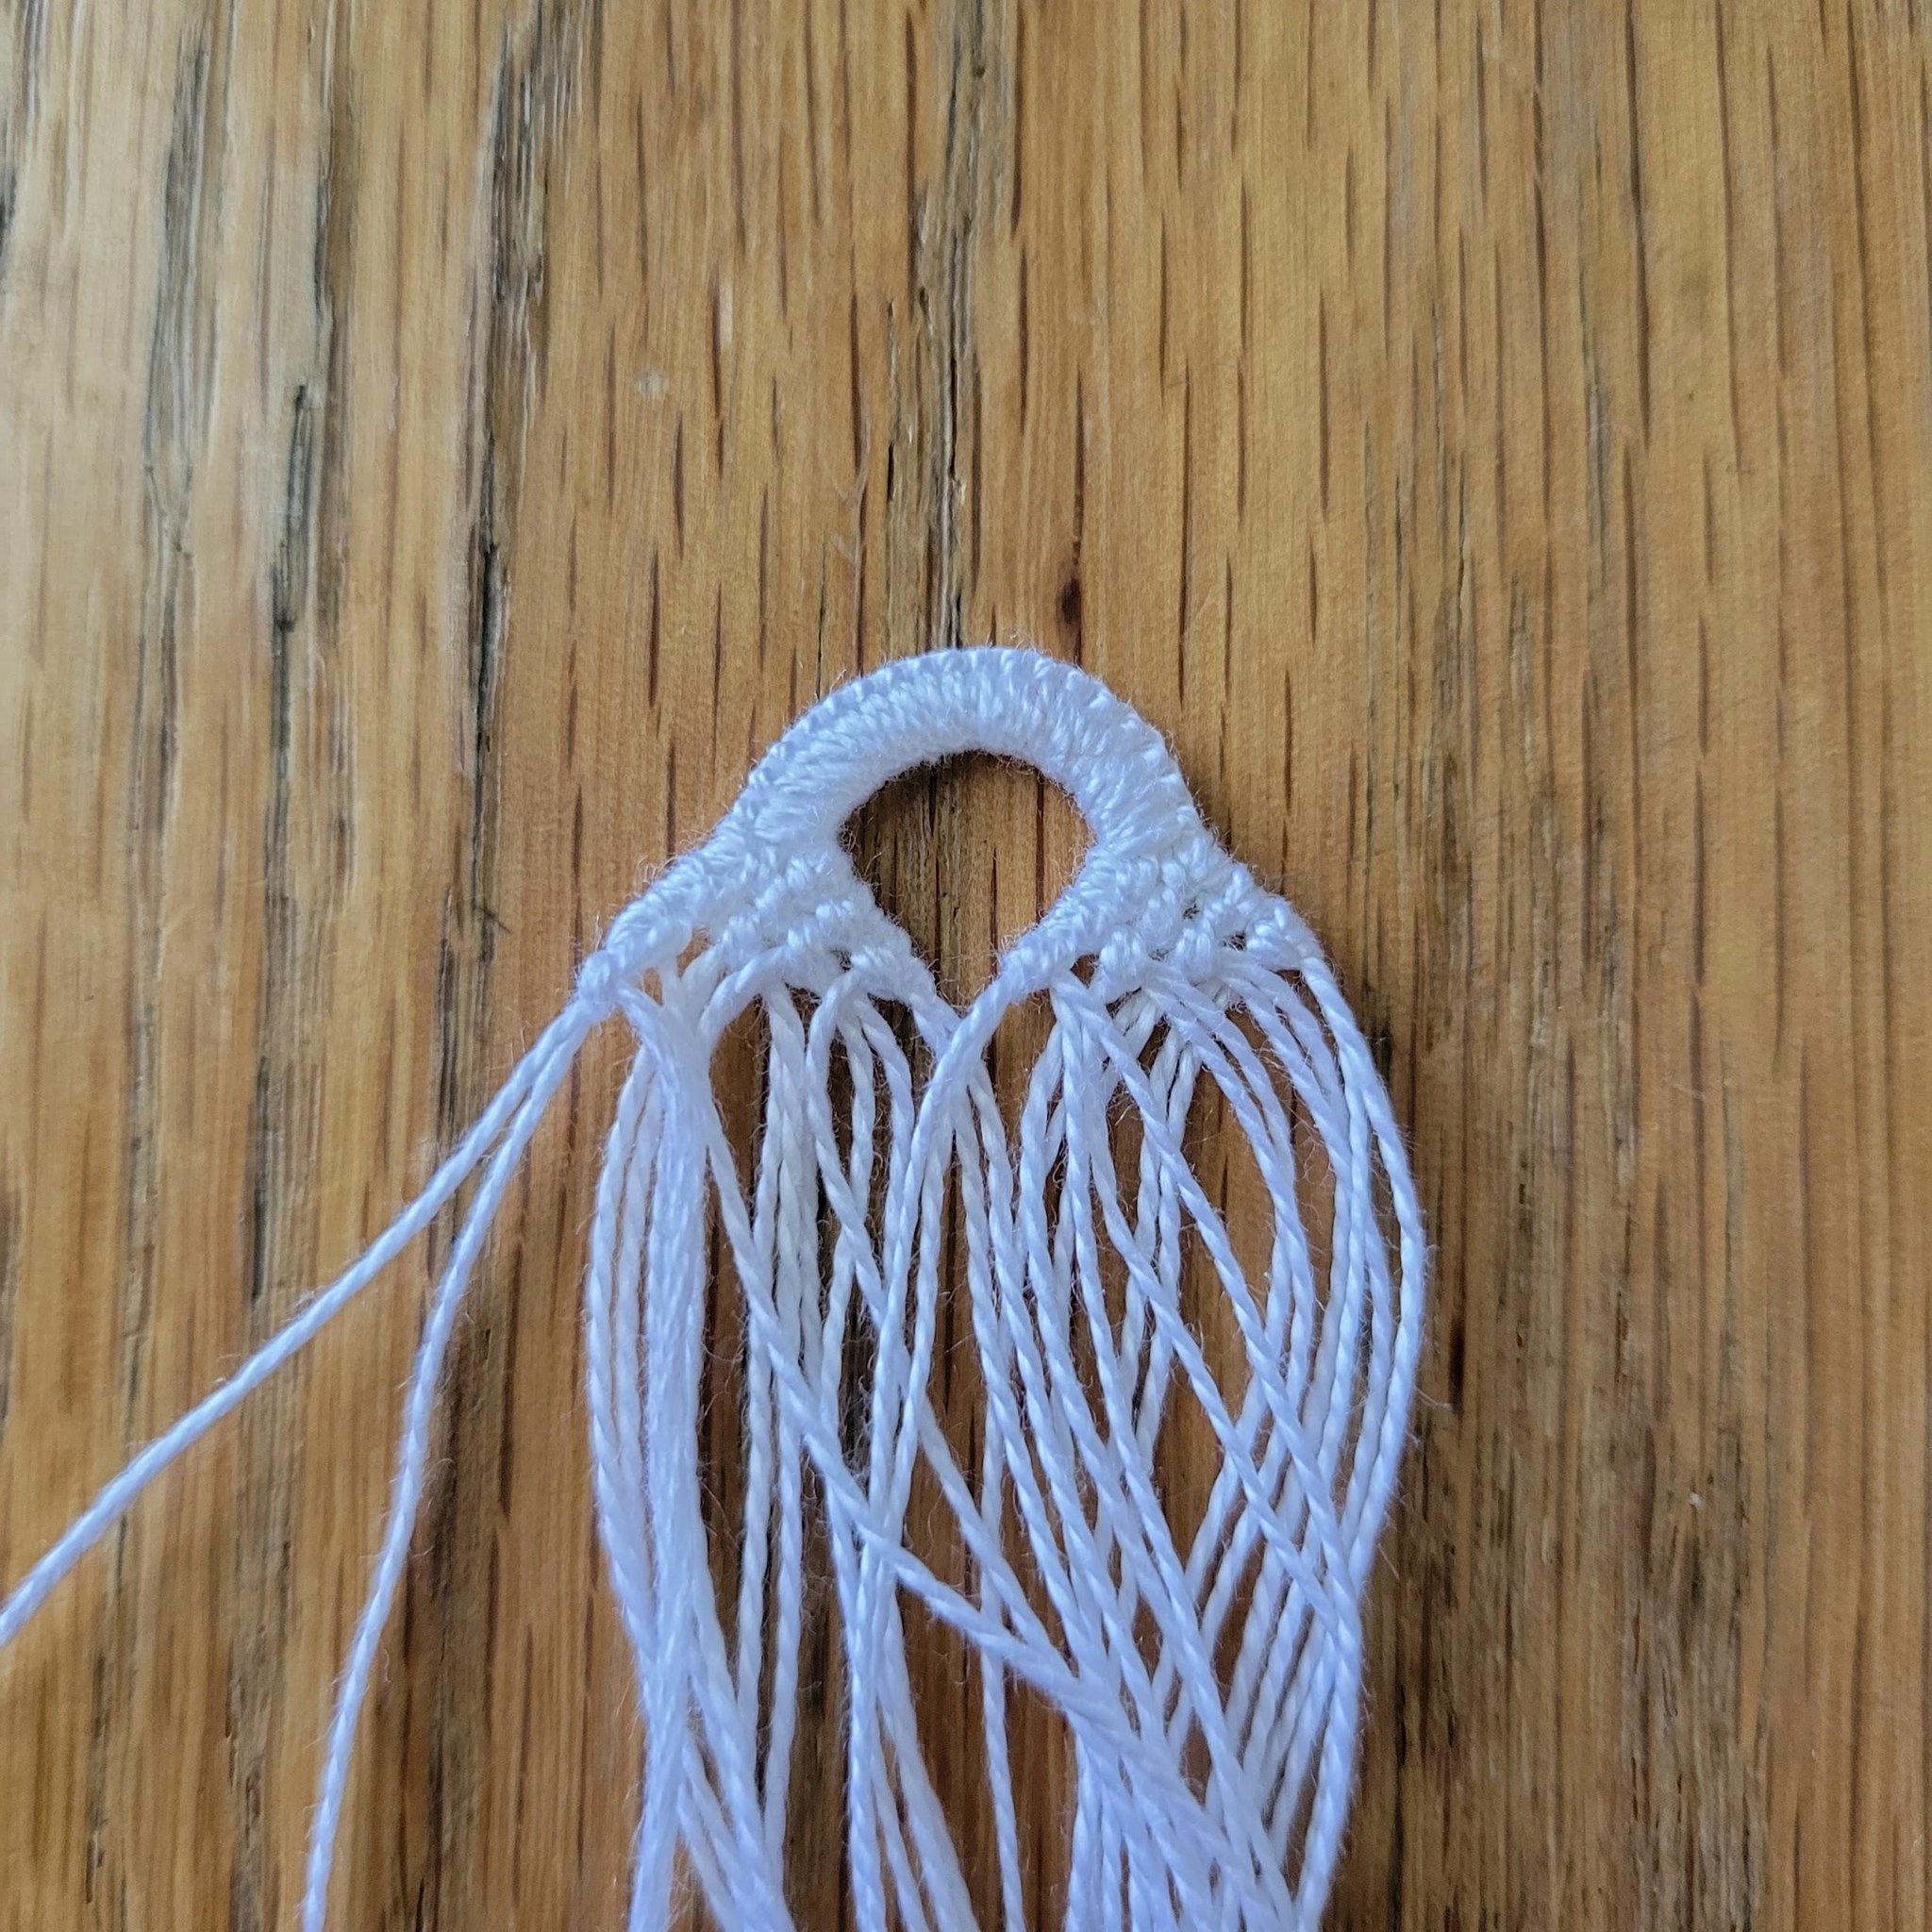
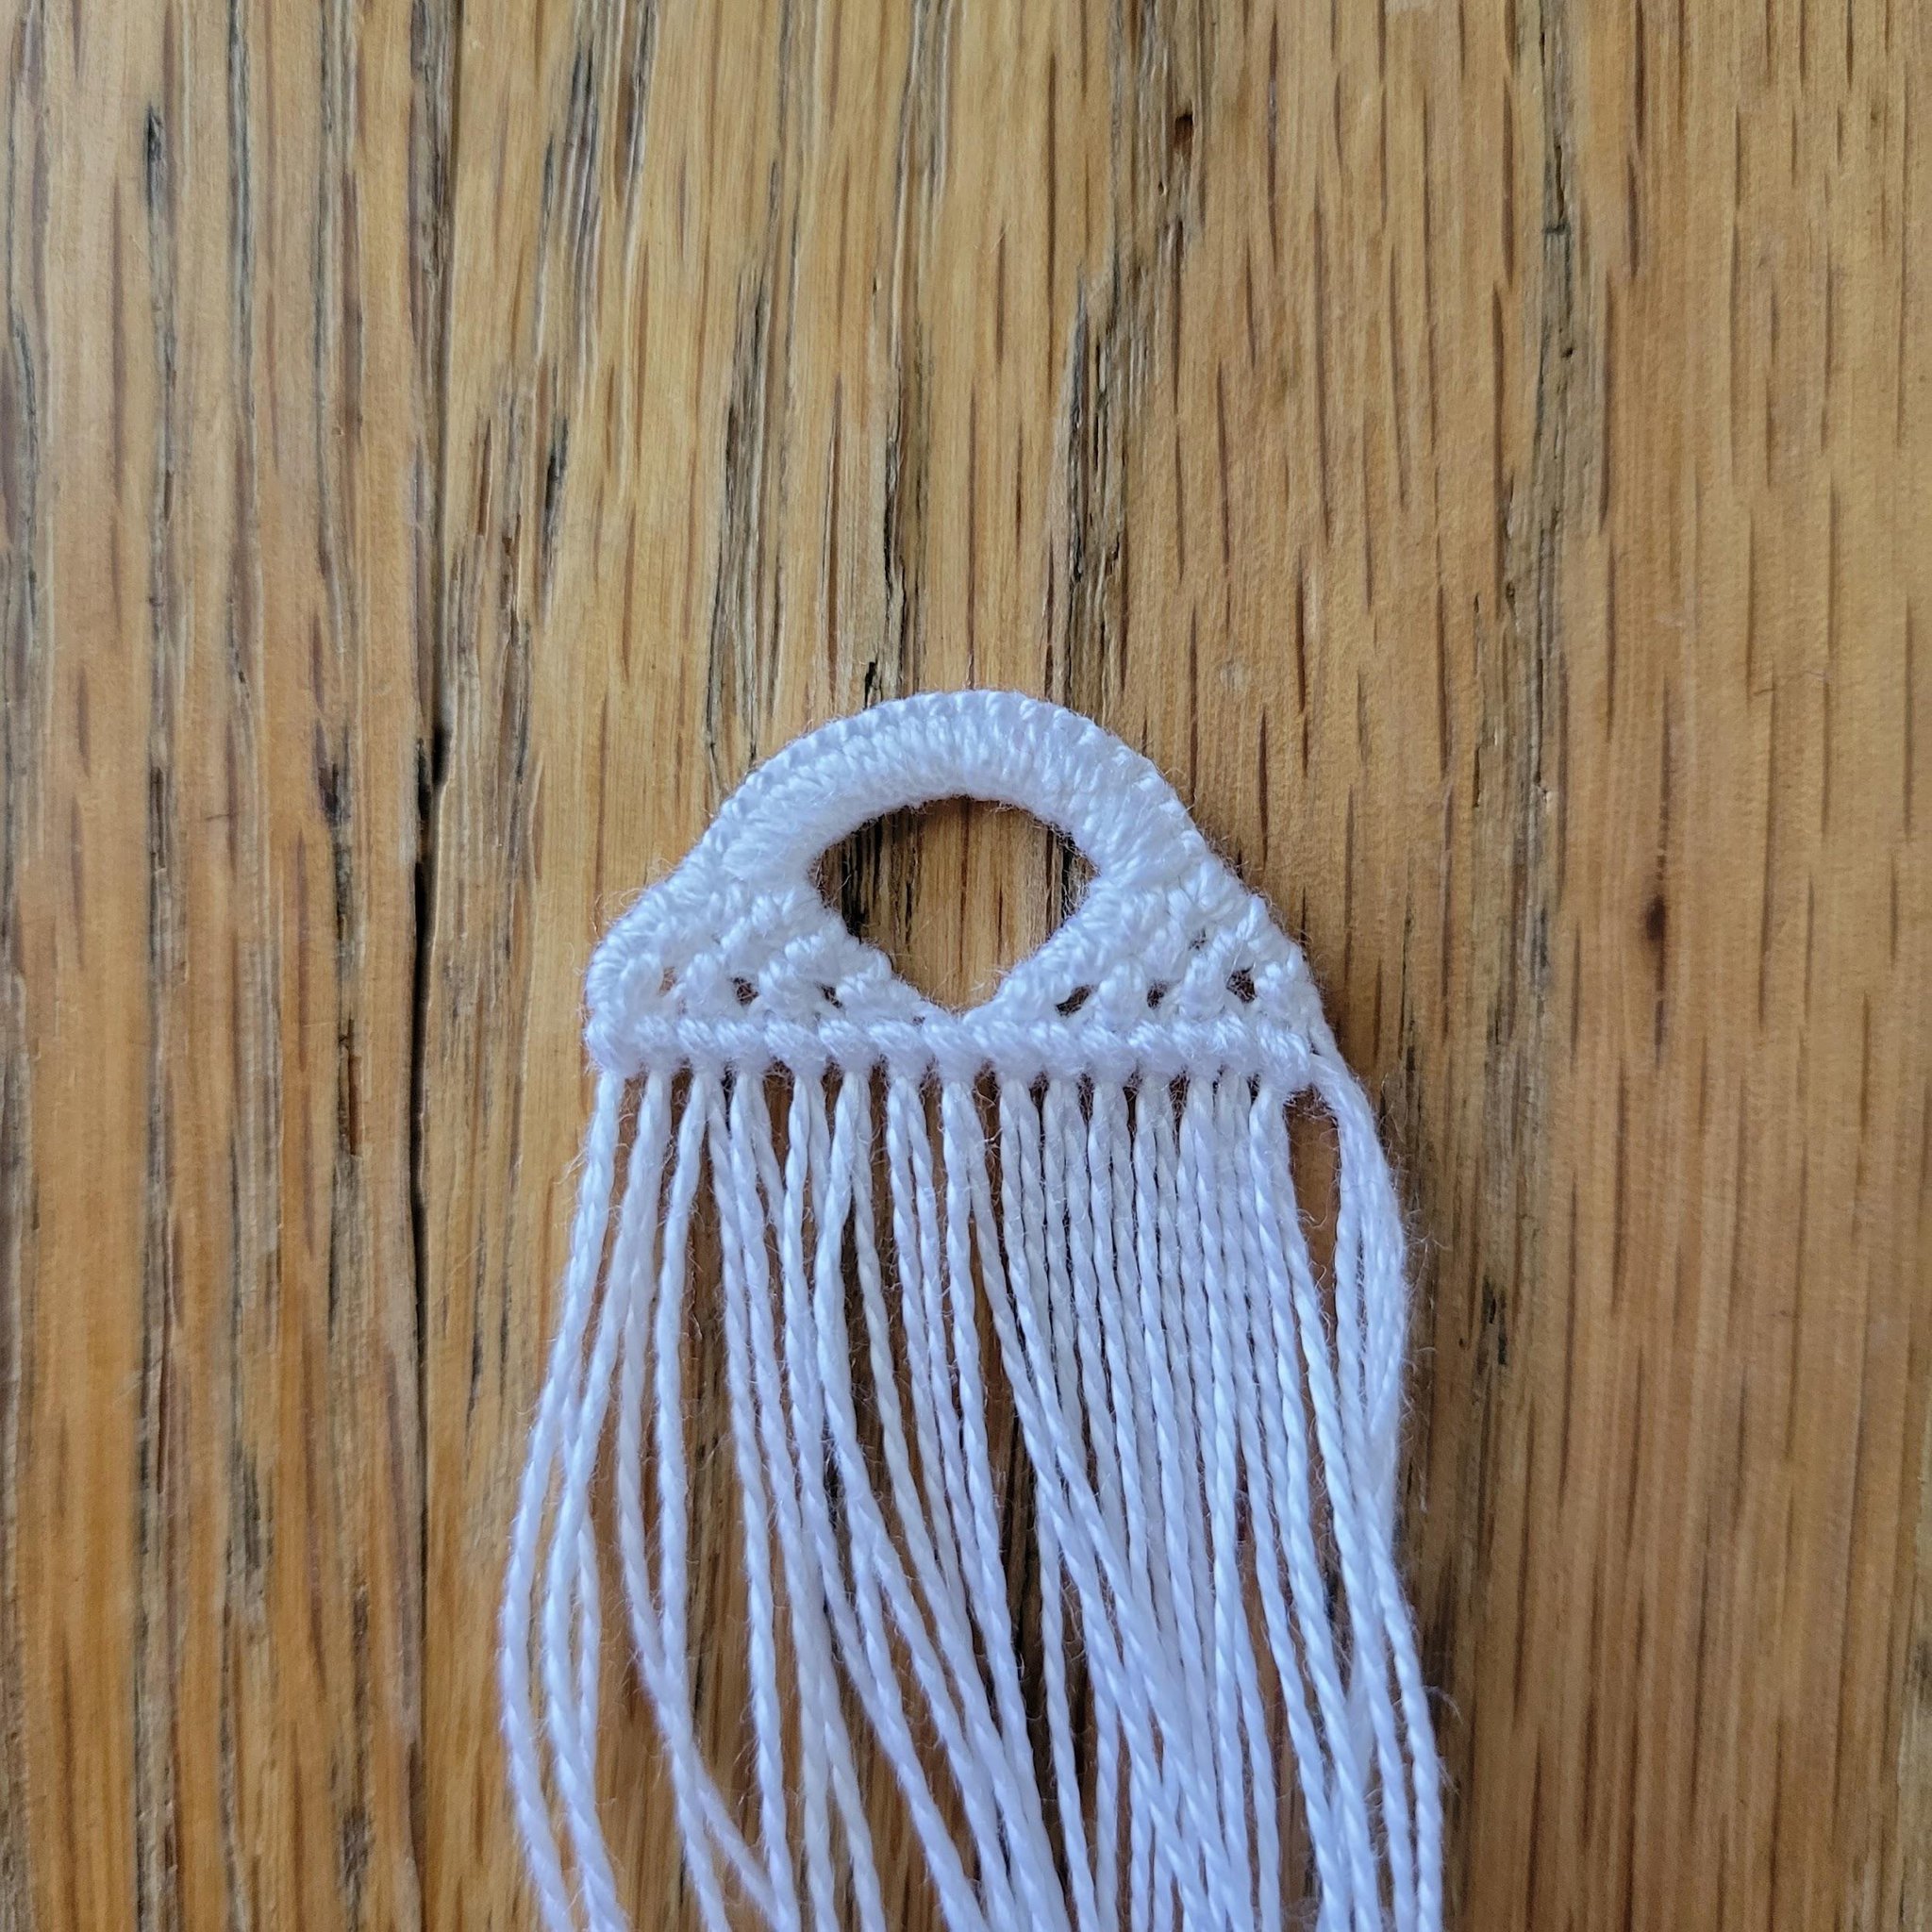
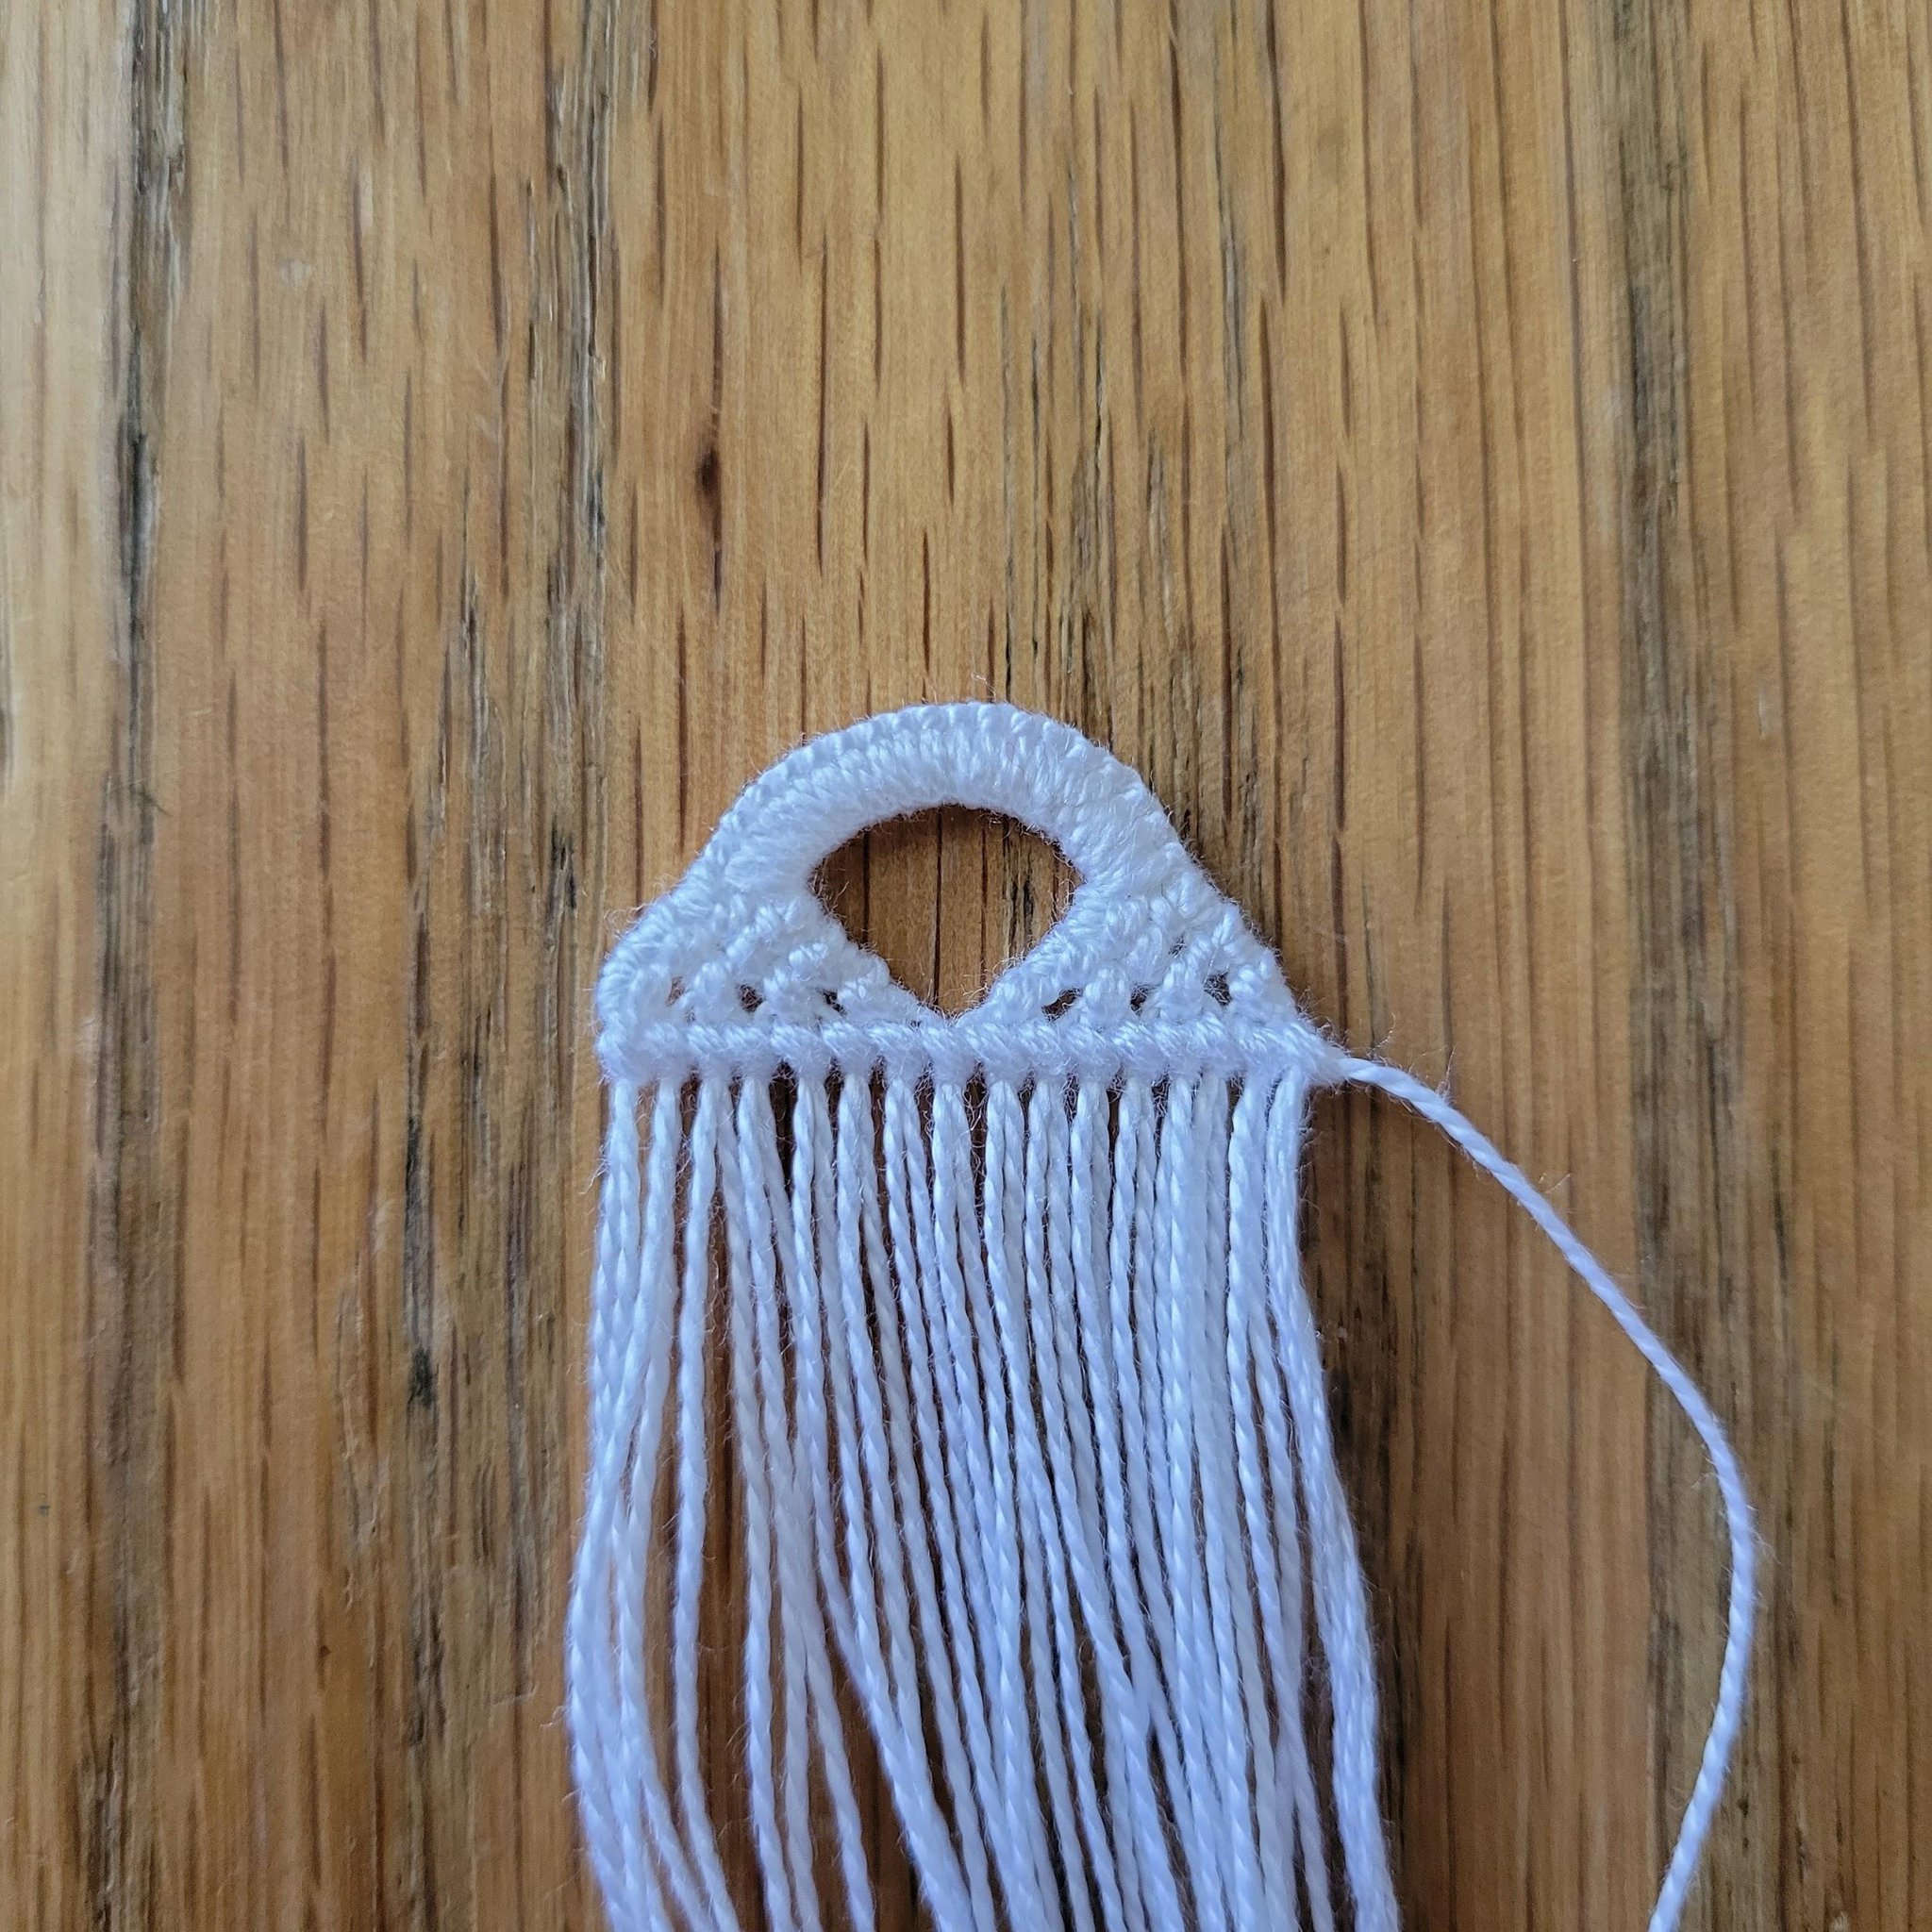
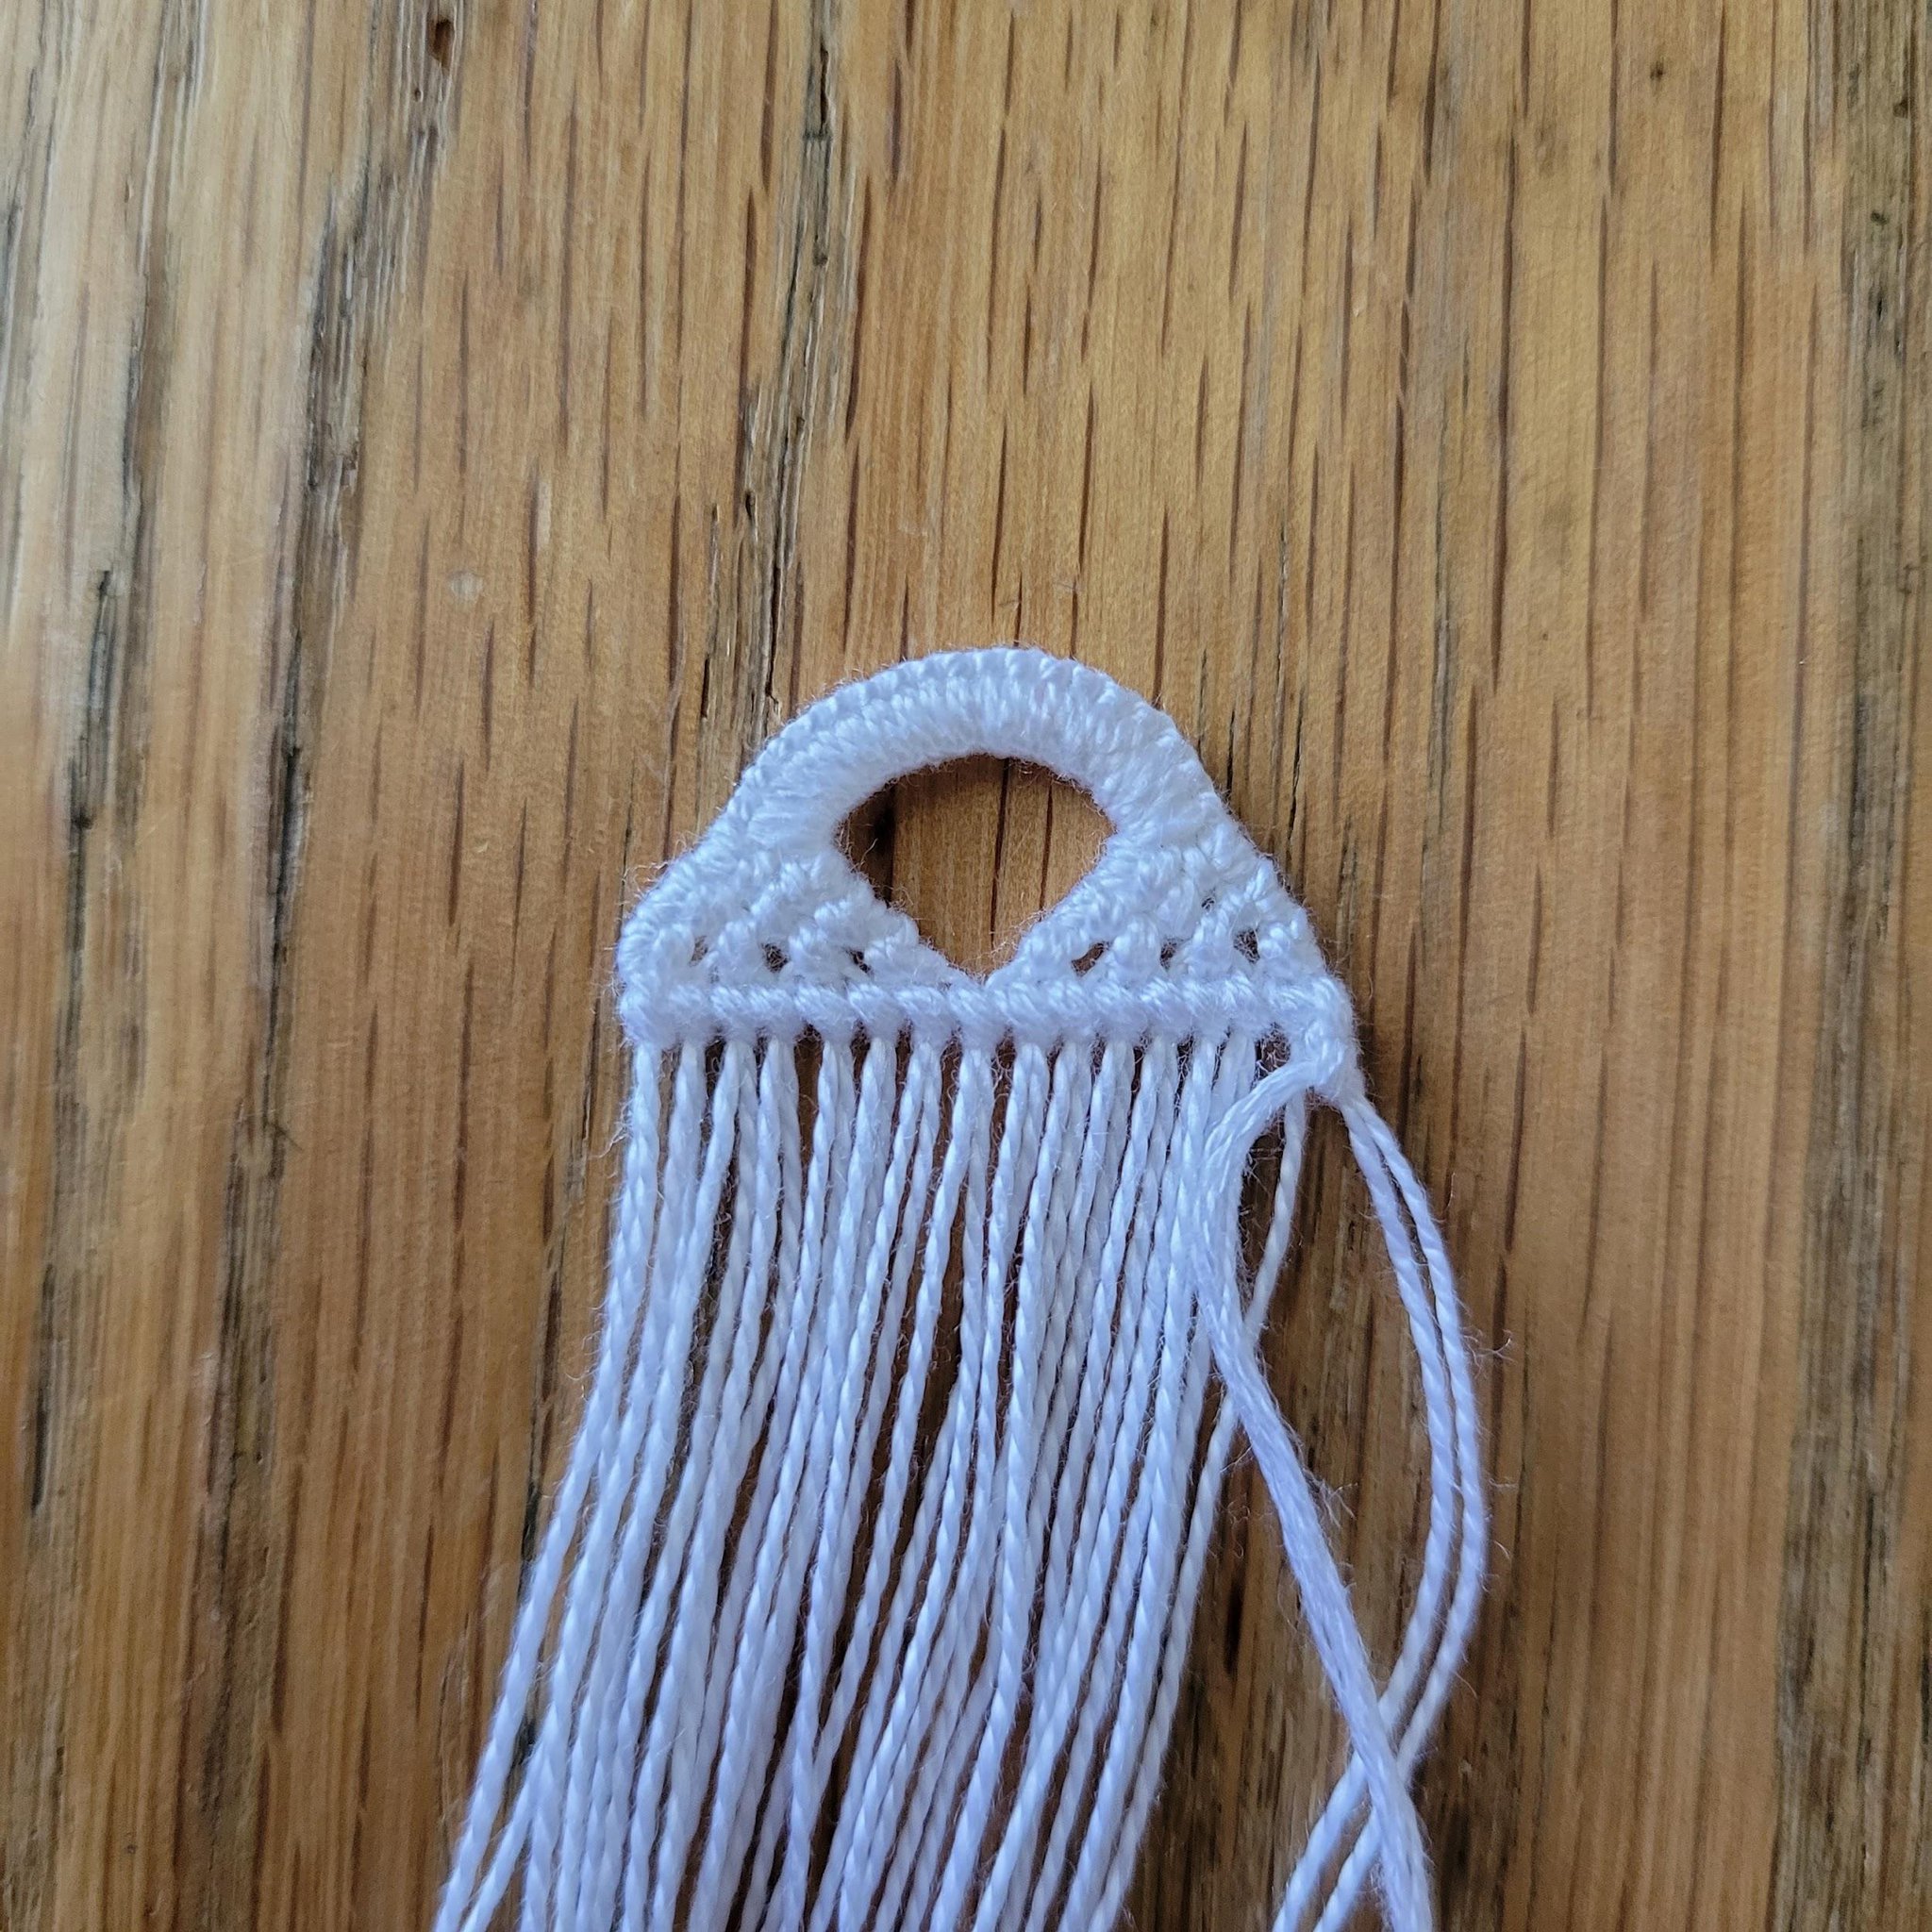
Next, begin your bracelet how you normally do. For this bracelet, I used the same technique shown in my tutorial for shaped starts and ends for odd-stringed Alphas.
https://www.braceletbook.com/tutorials/133_shaped-start s-and-ends-for-odd-stringed-alphas/
I included the knotting thread in my starts for this bracelet. I also paired threads together for knotting in my starts (I didn’t make knots with each individual thread). This takes less time and looks better than making knots with each thread individually.
Make sure your knotting thread ends up as the leftmost thread (if you want to start the row with a forward knot), or the second to leftmost thread (if you want to start the row with a backward-forward knot for straight edges).
Make your first knot of the row (a backward-forward knot if you’re using the straight edges technique, and a forward knot otherwise) onto two base threads.
Make forward knots for the rest of the row (each knot onto two base threads) until you have one base thread remaining.
Make the last knot of the row (a forward-backward knot if you’re using the straight edges technique, and a forward knot otherwise) onto only one base thread.
Make your next knot of the row (a forward-backward knot if you’re using the straight edges technique, and a backward knot otherwise) onto two base threads.
Every row of a Brickstitch Alpha will have each knot knotted onto two base threads, except for the last knot of the row, which is knotted onto only one base thread.
Every row of a Brickstitch Alpha will have each knot knotted onto two base threads, except for the last knot of the row, which is knotted onto only one base thread.
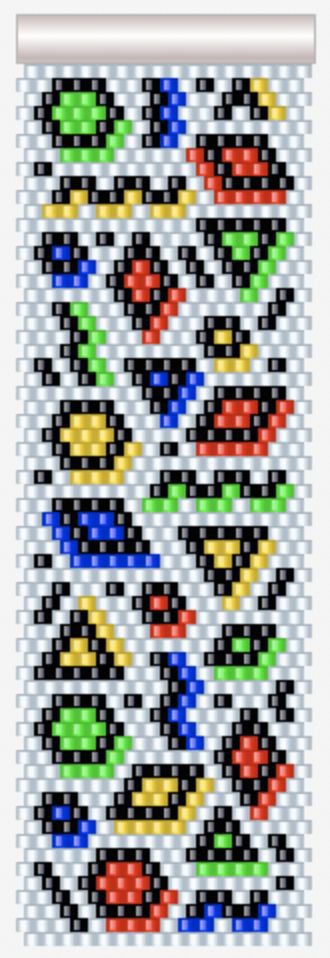
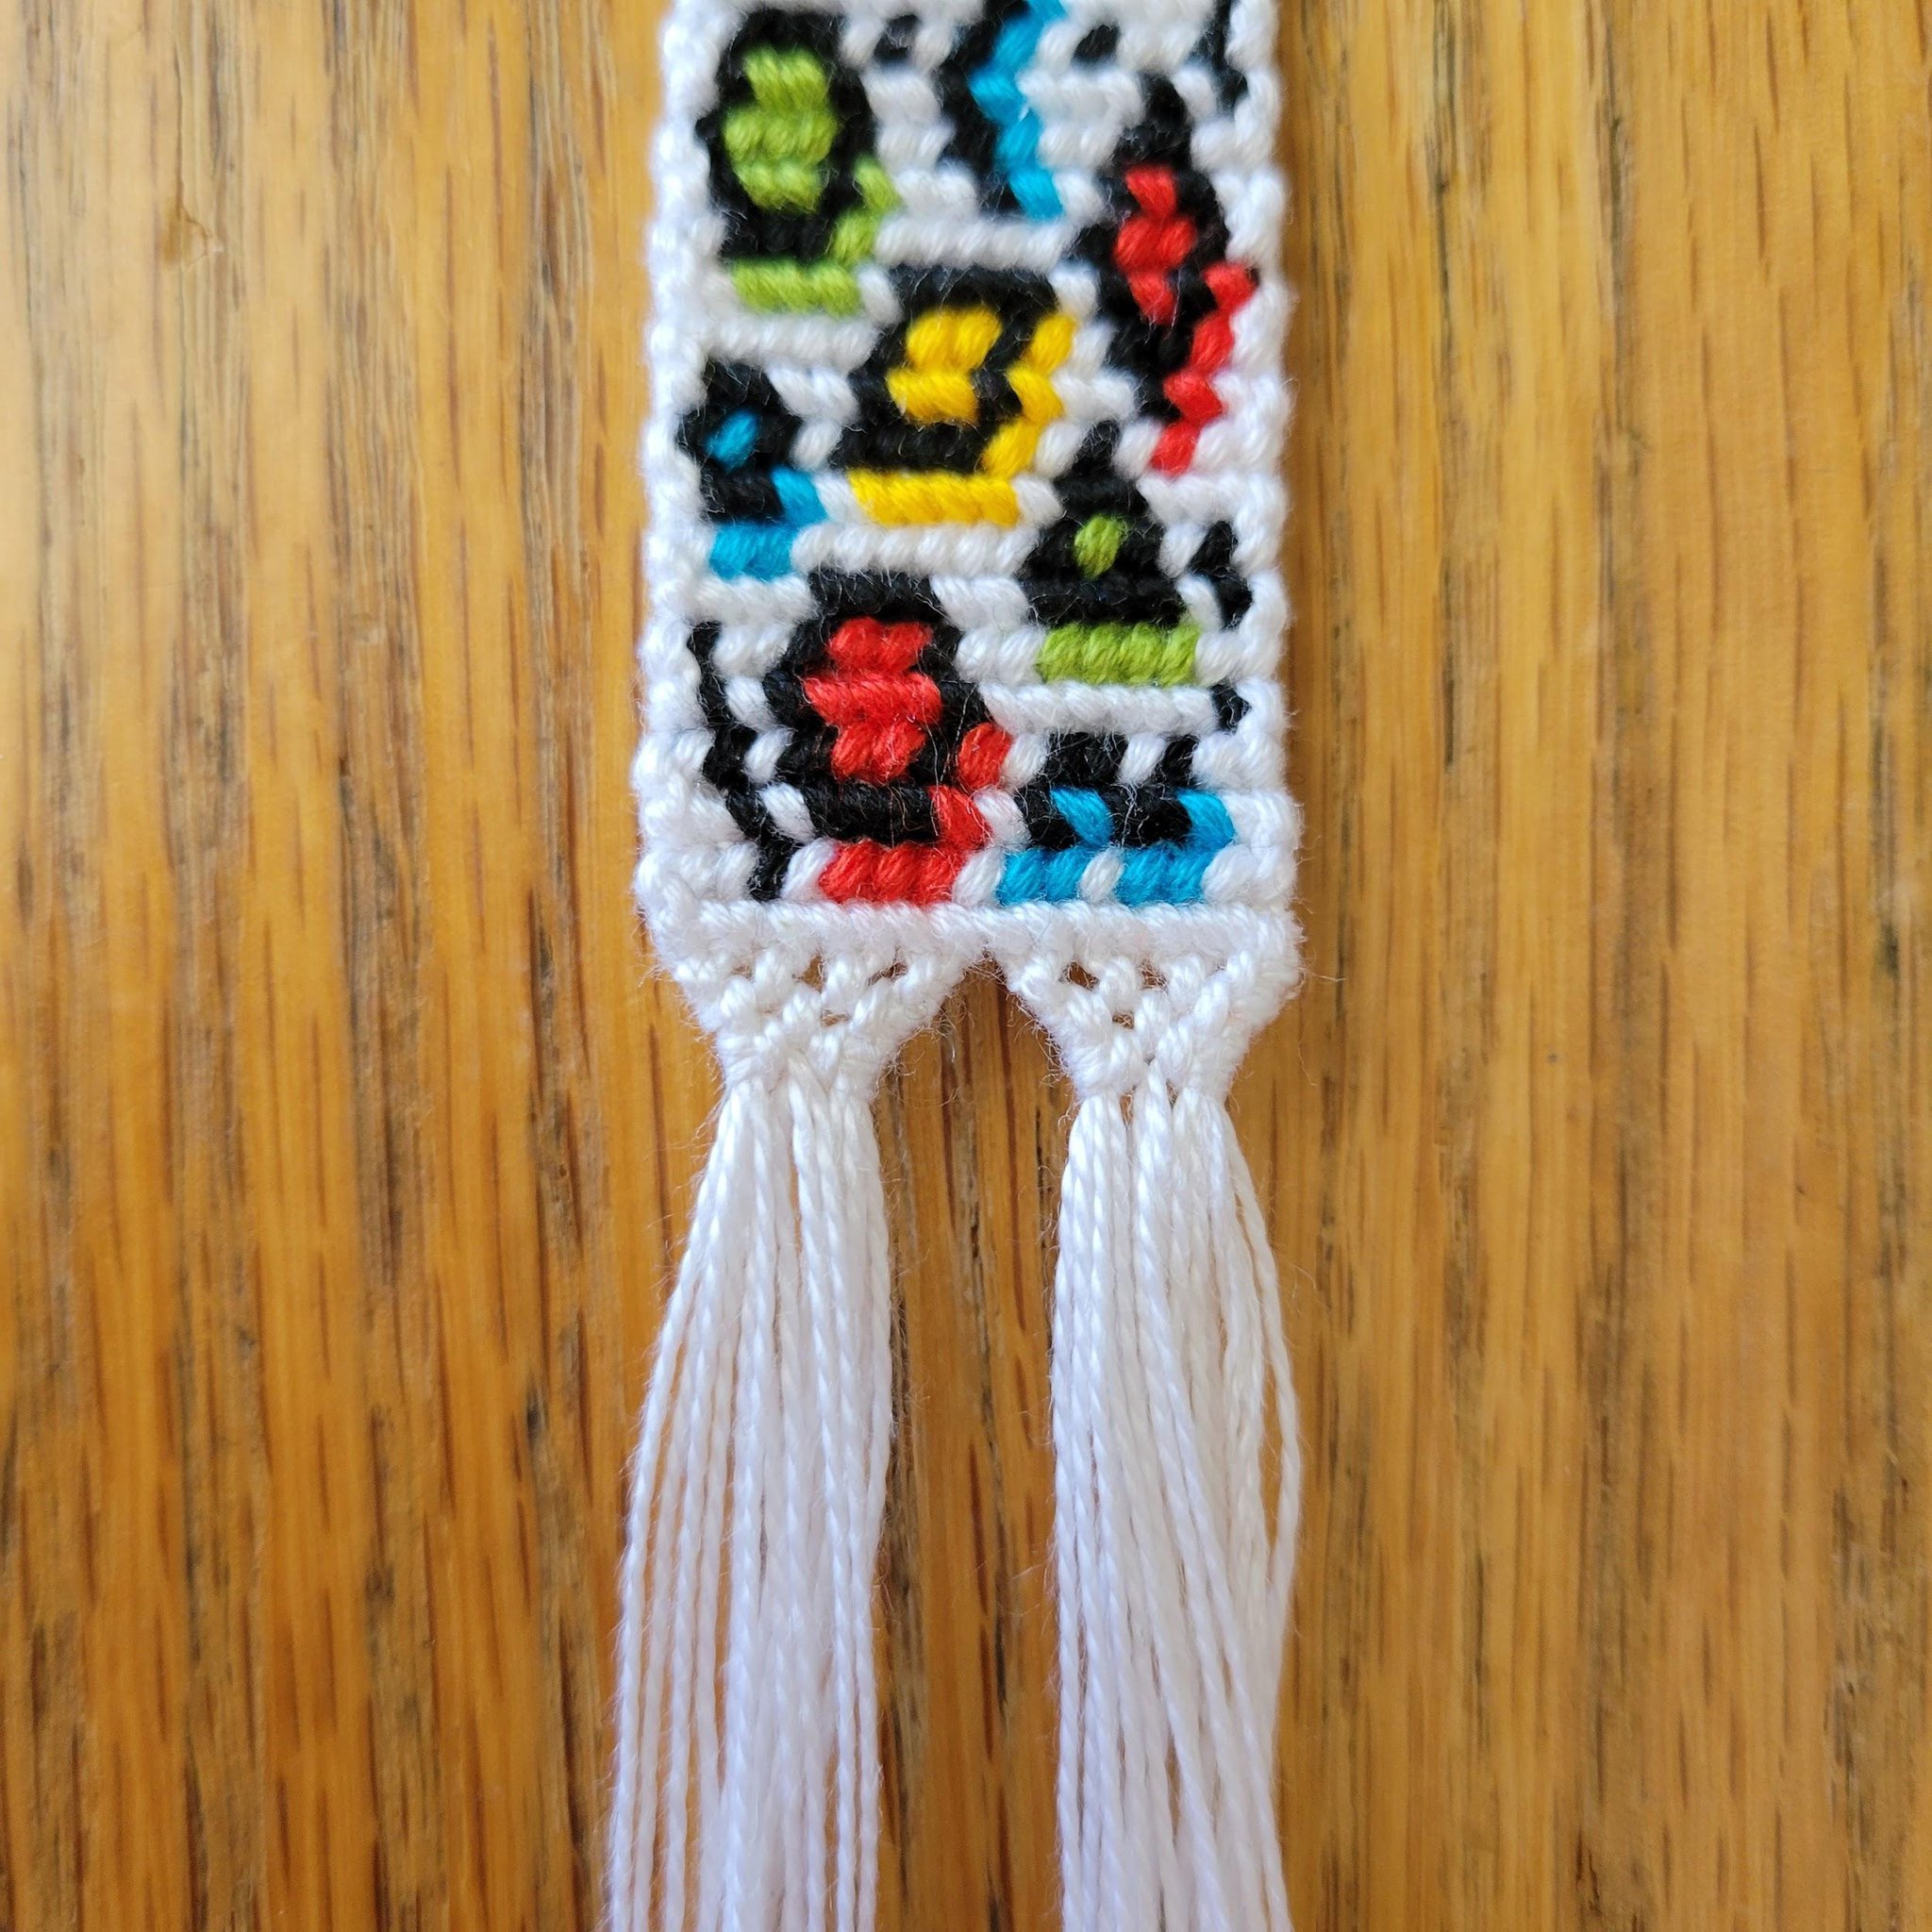
When reading a Brickstitch Alpha pattern, it is important to note which rows are forward rows (consisting primarily of forward knots) and which rows are backward rows (consisting primarily of backward knots). If a row is shifted to the right, it is a forward row. If a row is shifted to the left, it is a backward row. For example, in this pattern the first row is a forward row, the second is a backward row, etc. All patterns created with the generator I mentioned will start with forward rows.
Other than these differences, Brickstitch Alphas are knotted just like regular Alphas. Knotting on new colors is done the same way, switching colors is done the same way, etc.
A note about the straight edges technique: Because of how the rows are organized in Brickstitch Alphas, your edges will not be perfectly straight, even if you use the straight edges technique. It does help your edges look a little straighter, though. The mushroom and geometric shape bracelets in the thumbnail for this tutorial were made using the straight edges technique, and the honeycomb bracelet was made without it.
Knot the rest of your bracelet until you’ve reached your desired length.
Create the ends of your bracelet how you usually would (again, I used the tutorial for shaped starts and ends with odd-stringed Alphas, linked earlier in this tutorial).
Create the ends of your bracelet how you usually would (again, I used the tutorial for shaped starts and ends with odd-stringed Alphas, linked earlier in this tutorial).
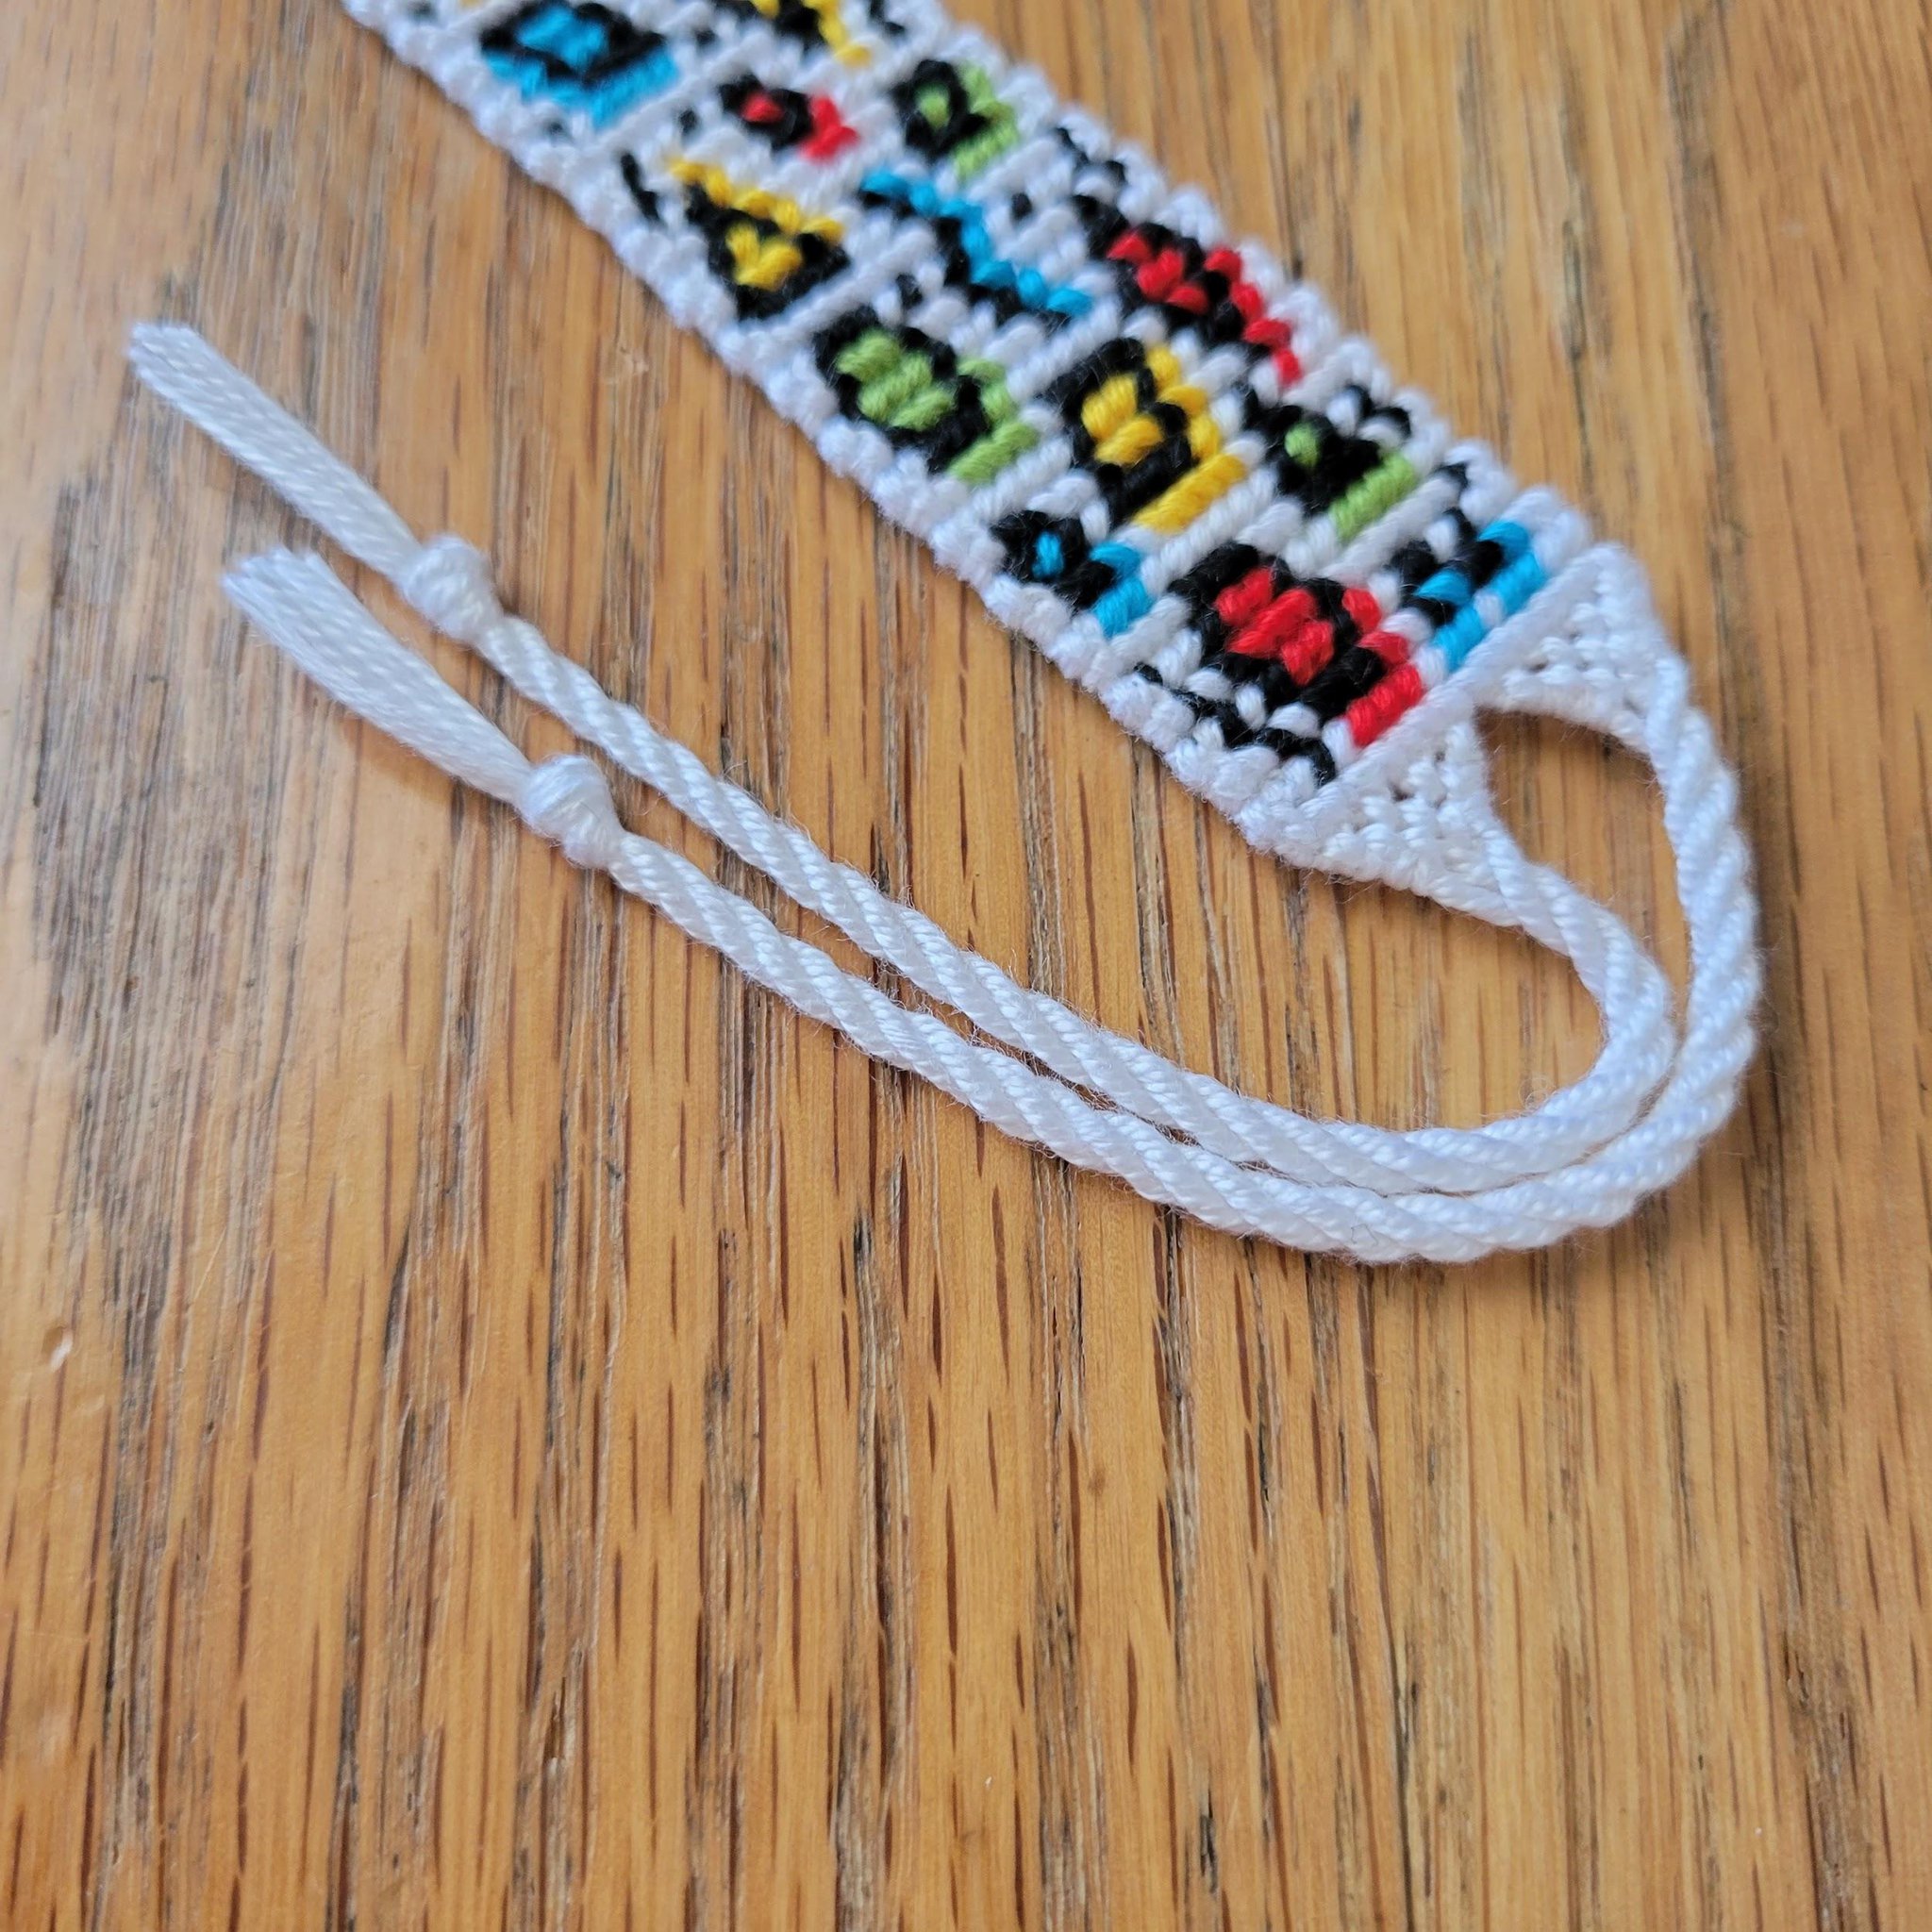
Create whatever ties you would like. I made three-stranded twisted ties (which are just regular twisted ties with three strands instead of two).