Rate Tutorial
In this tutorial I will explain how to segment knot using pattern #14702 as an example. You can follow these steps with any normal pattern that isn't a 1212 pattern.
What is segment knotting?
Segment knotting is when instead of going row by row when doing a normal bracelet you knot in segments. Segments are groups of knots that can be done at once without getting in the way of other knots.
If you have done a candystripe (#1) or chevron (#2) you most likely already used this technique. You knotted in diagonals instead of row by row.
Segment knotting needs a little bit of practice but compared to knotting row by row it can be a lot faster but not every pattern is good for segment knotting.
How to segment knot a chevron?
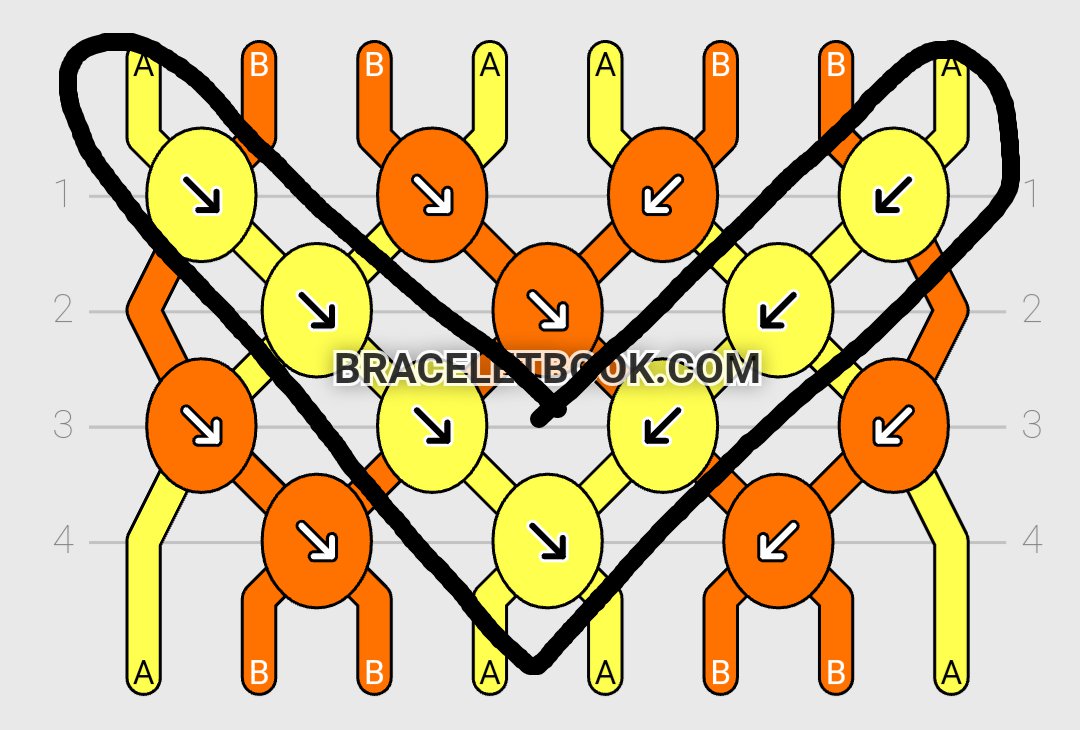
In the chevron for example the segment is this v-shape. It repeats over and over again which makes the chevron one of the easiest bracelets.
To knot this segment you take the outer-right string and do b knots with that string onto all the strings on the right side until you're in the middle. Then you take the outer-left string and do f knots onto all the strings on the left side until you're in the middle. Then you do any knot you like between the two strings that are now in the middle.
If two strings have the same colour you can do any knot you like between them. It won't make a difference. Knowing that can be helpful for segment knotting.
How do I recognise segments in a pattern?
Finding segments is easy. You just need to look for diagonals that are in just one colour that consist of f or b knots.
These diagonals can start or end with fb or bf knots but they can't have fb or bf knots somewhere in the middle. These types of knots change the direction of the string which means you can't continue knotting with that string until you did all the knots that come before the next knot you want to do. The only exception is if these knots are between strings of the same colour. In that case you can change them to f or b knots.
In our example pattern #14702 there are some fb and bf knots between strings of the same colour for aesthetic reasons (doing them makes the backside of the bracelet look nicer). You can replace them with f or b knots if that makes the knotting process faster/easier for you.
Patterns that consist of only fb and bf knots (so called 1212 patterns) can't be segment knotted. An example for that would be pattern #7437.
Step 1
When you have a bit more practice you can skip this step, you can then do it in your head instead.
Print out your pattern or screenshot it. You need to be able to draw on your pattern to mark the segments.
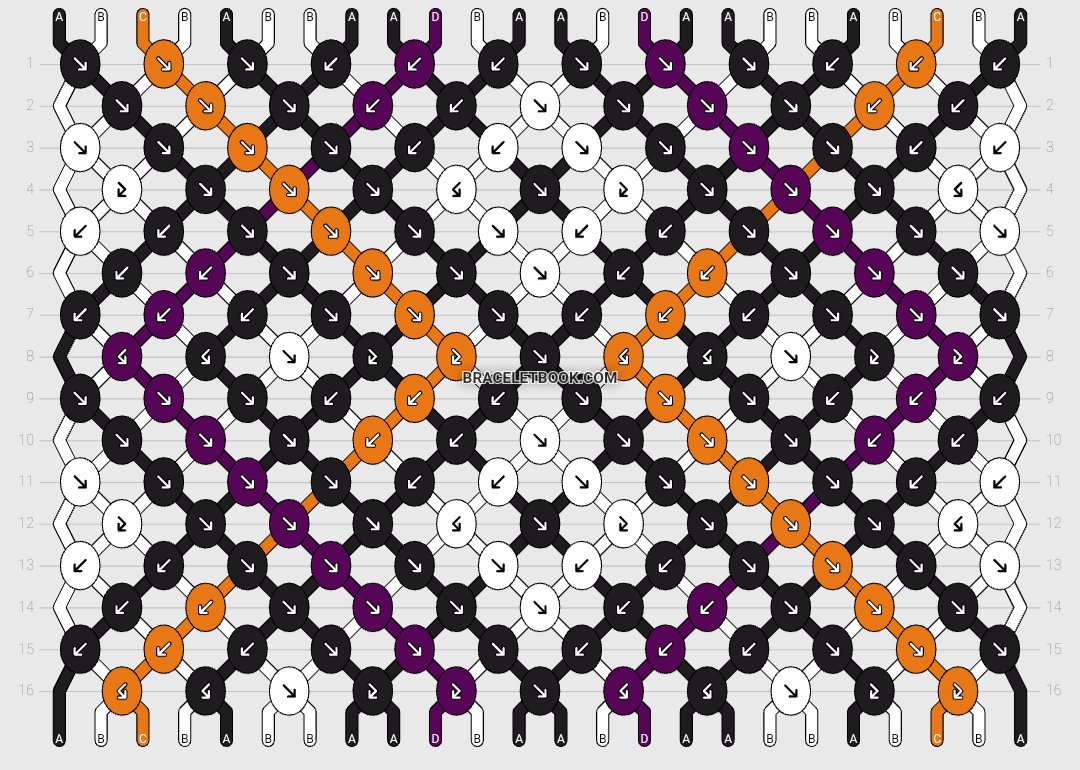
As an example I'm going to take pattern #14702. I took a screenshot of it and used the photo editor on my phone to draw on it.
Print out your pattern or screenshot it. You need to be able to draw on your pattern to mark the segments.
As an example I'm going to take pattern #14702. I took a screenshot of it and used the photo editor on my phone to draw on it.
Step 2
Try figuring out if the pattern repeats. Patterns on braceletbook sometimes only get accepted if the strings on the bottom are in the same order as the strings on top. Sometimes that means the same parts repeat until all the strings are in the right order again.
Pattern #14702 repeats twice. Rows 1 to 8 are the same as rows 9 to 16 but orange and purple have switched places.
If a pattern repeats you only have to figure the segments out for one repetition.
Pattern #14702 repeats twice. Rows 1 to 8 are the same as rows 9 to 16 but orange and purple have switched places.
If a pattern repeats you only have to figure the segments out for one repetition.
Step 3
Look for long diagonal rows in your pattern.
In pattern #14702 those are the orange and the purple stripe with the black outline that goes to the right. Those two are segments. The parts between them are made of smaller segments.
In pattern #14702 those are the orange and the purple stripe with the black outline that goes to the right. Those two are segments. The parts between them are made of smaller segments.
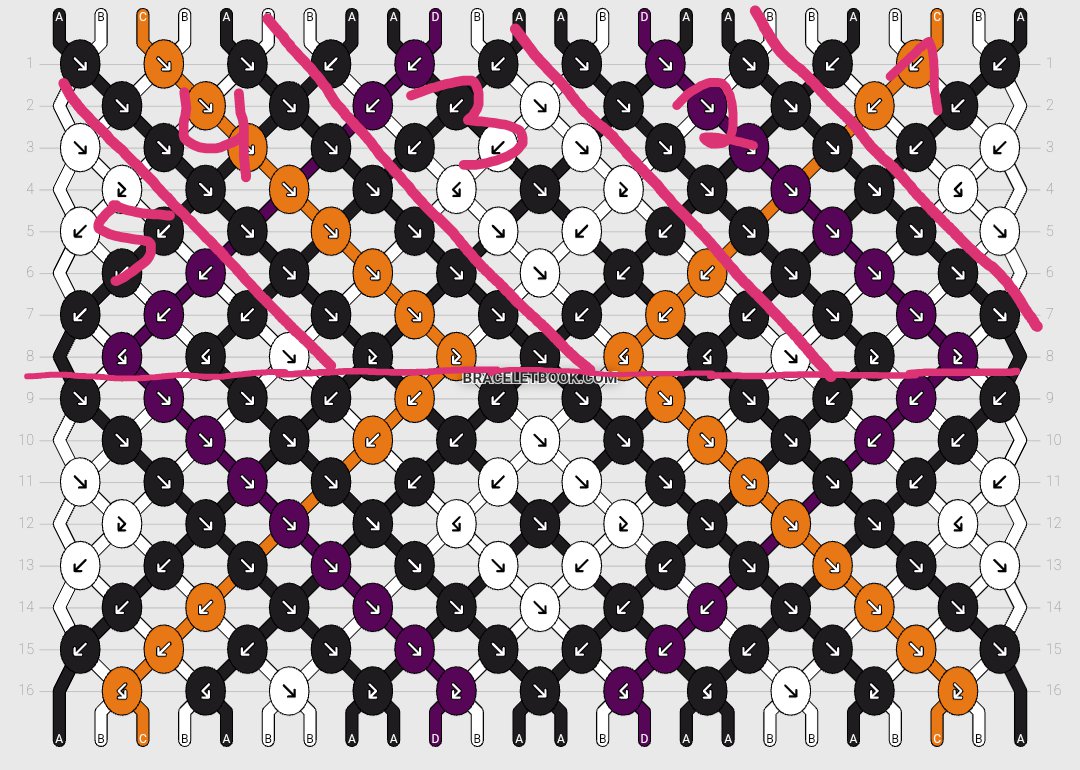
Step 4
Repeat this step after finding new segments.
Try figuring out a rough order in which you need to knot your segments. This order includes the segments you figured out but also the big parts that are made of smaller segments that you haven't figured out yet.
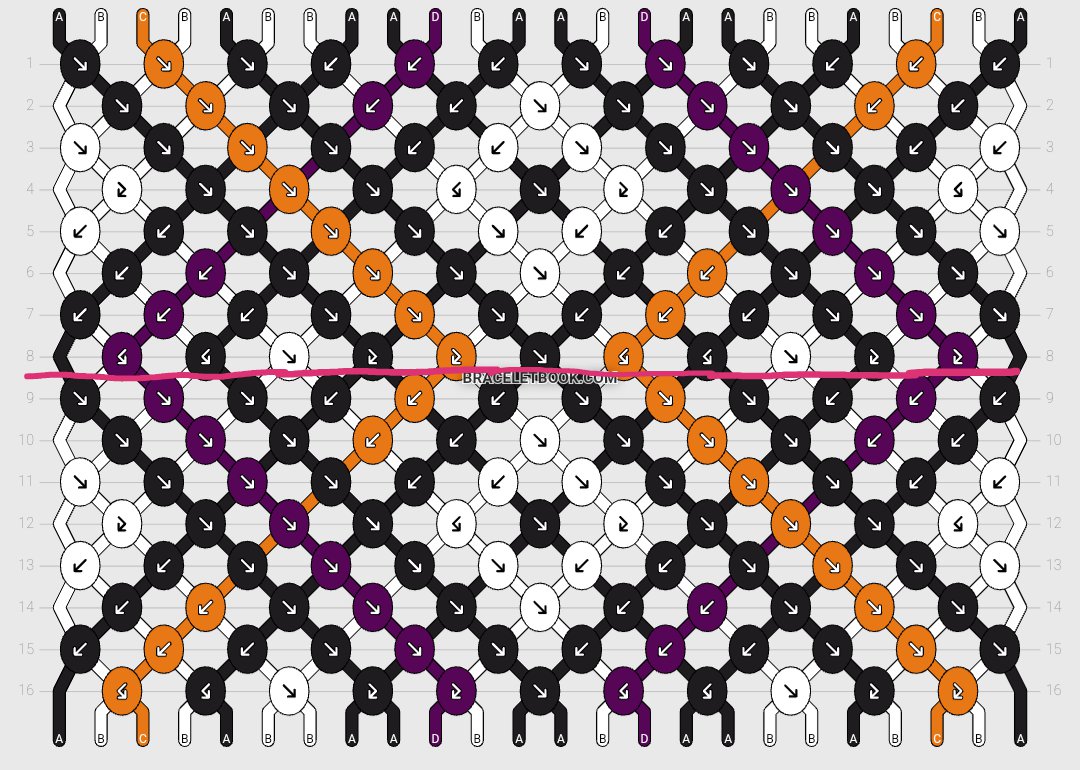
Looking at our pattern we can see that the biggest segments are almost like a candystripe that goes from left to right. We have divided our pattern into 5 parts so far. To figure out in which order we need to knot these parts we look if there are knots in an other part that are done before the part we want to knot.
If we look at the purple diagonal we can see that that there are knots in the right part that are above the knots in the purple diagonal. That means we need to do the part on the right before we do the purple triangle.
I wrote the numbers 1 to 5 on all the parts based on the order they need to be knotted in.
Try figuring out a rough order in which you need to knot your segments. This order includes the segments you figured out but also the big parts that are made of smaller segments that you haven't figured out yet.
Looking at our pattern we can see that the biggest segments are almost like a candystripe that goes from left to right. We have divided our pattern into 5 parts so far. To figure out in which order we need to knot these parts we look if there are knots in an other part that are done before the part we want to knot.
If we look at the purple diagonal we can see that that there are knots in the right part that are above the knots in the purple diagonal. That means we need to do the part on the right before we do the purple triangle.
I wrote the numbers 1 to 5 on all the parts based on the order they need to be knotted in.
Step 5
Repeat if needed.
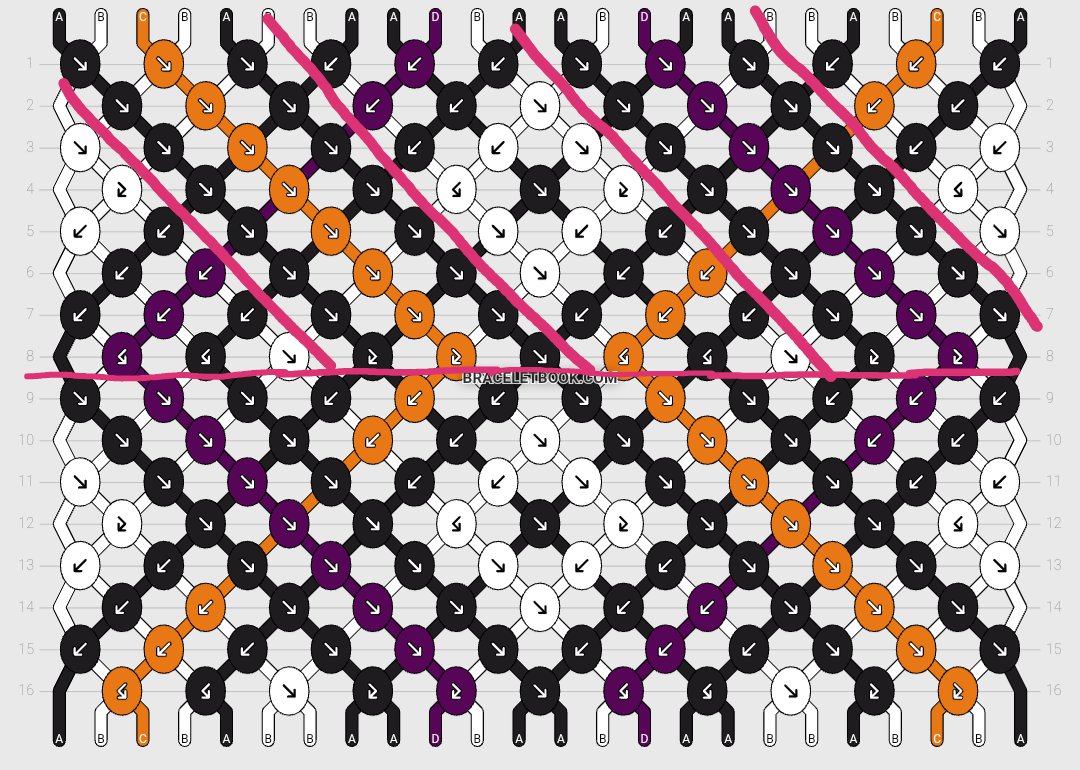
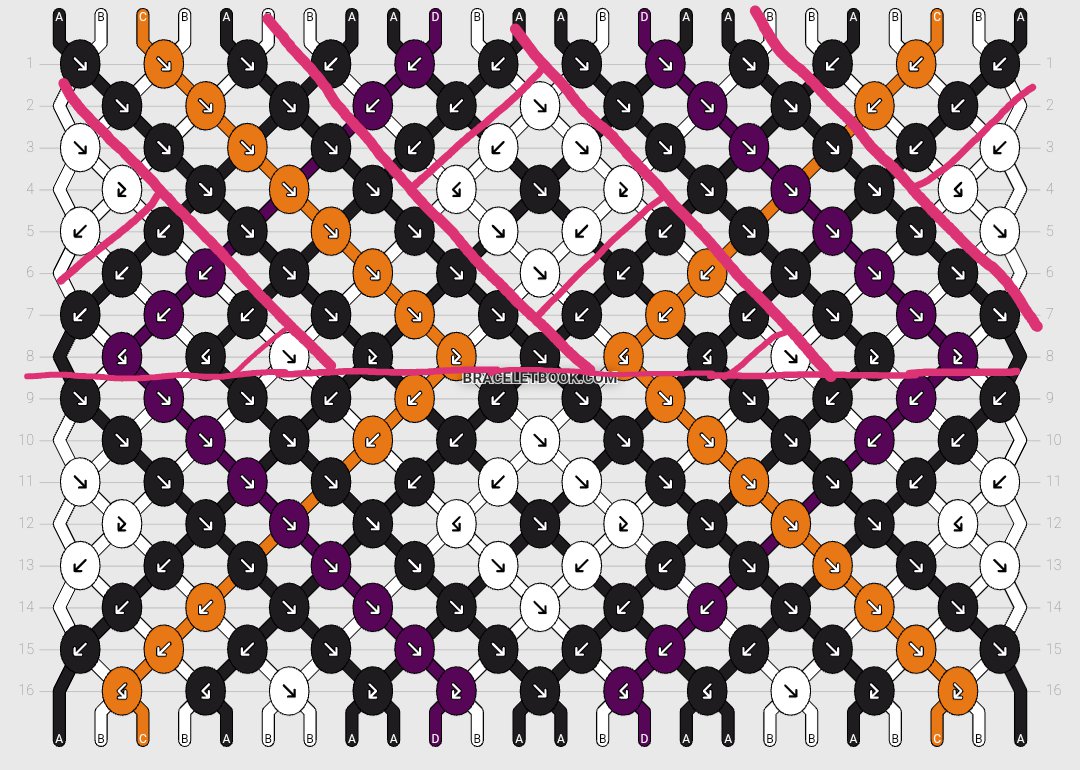
Look for shorter diagonal rows.
In the pattern a purple outlined diagonal and an orange outlined diagonal cross “under” the long purple and orange diagonals. The visible parts of those diagonals are smaller segments.
Look for shorter diagonal rows.
In the pattern a purple outlined diagonal and an orange outlined diagonal cross “under” the long purple and orange diagonals. The visible parts of those diagonals are smaller segments.
Step 6 (repetition of step 4)
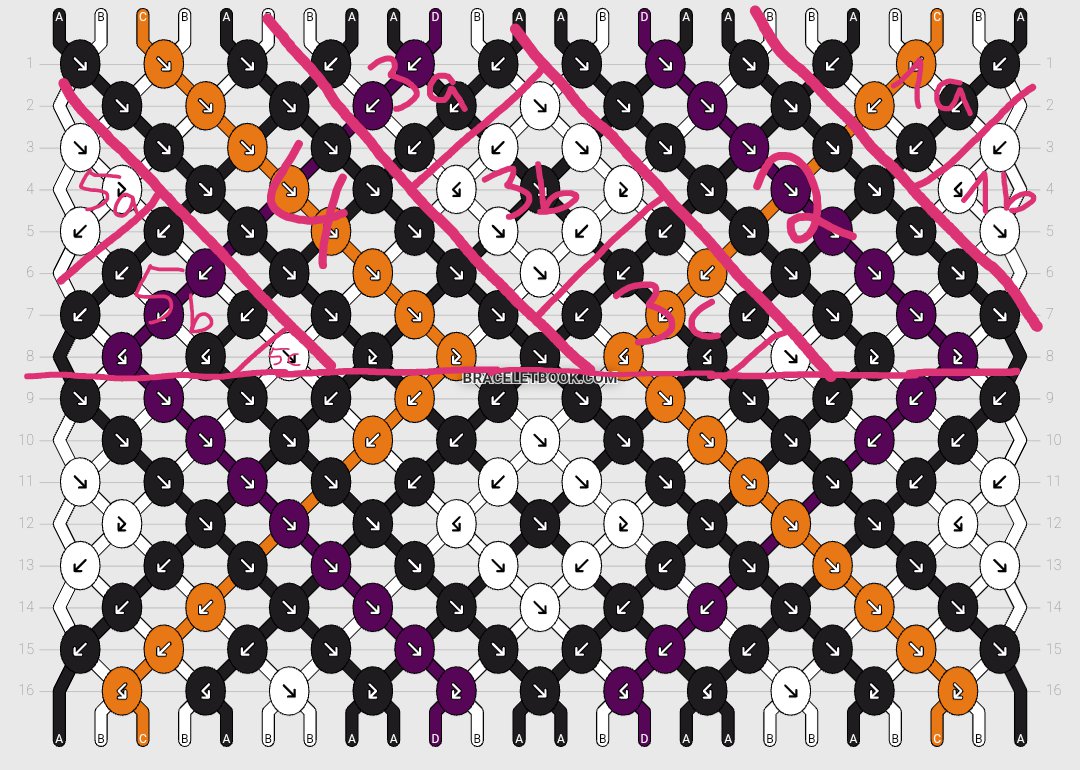
The parts between the big segments are now divided into segments as well. You have now found all segments in this pattern. For some patterns you need to repeat step 5 after this one if you haven't found all the segments yet.
Now you can figure out the exact order you need to knot your segments in. You can use the numbers from step 4 as an orientation.
I like to add letters instead of numbers for the smaller segments.
Again I look at which segments are “on top” of others. These segments need to be knotted before the ones that are under them.
I now know the order in which I need to knot all the segments in this pattern.