Rate Tutorial
When you see friendship bracelets, you would say they are really hard to make, but that's not true. It will take long to make your first bracelets and you'll do a lot of mistakes, but if you will be patient, you'll be able to make a bracelet in just a few hours!
Every pattern is made out of one to four knots. So all you have to do is learn four knots and you'll be able to do any pattern.
The knots are:
- forward knot
- backward knot
- forward-backward knot
- backward-forward knot
The knots are:
- forward knot
- backward knot
- forward-backward knot
- backward-forward knot
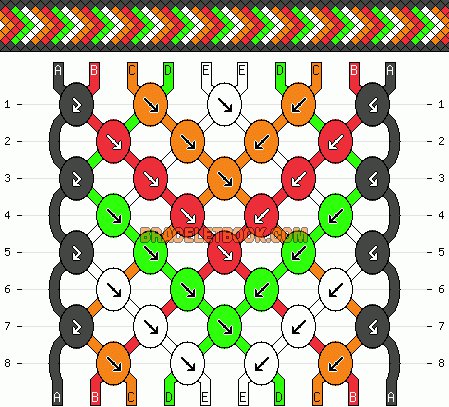
Friendship bracelets are basically coloured knots joined together to make a pattern that you like.
Patterns are always tied downwards, except for the Alpha patterns. Never tie them upwards again.
Every knot is made out of two strings (of course there are exceptions like multicolour alpha patterns etc.)
One string is a 'working' and the other one is a 'back' string. The working string is the one you're tying with and the one that you can see when the knot's finished. With the working string we do a knot over the back string. You shouldn't be able to see the back string at all in your bracelets.
While doing the bracelet, the strings change the order every time you make a knot. So once the string is a back string, but in the other knot, it can be used as a working string.
Every knot in the bracelet is basically a double-knot (That is a rule that need to be kept while making all of the friendship bracelets! When we say knot, we mean a double-knot.) Never make one knot for each knot, always do double.
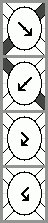
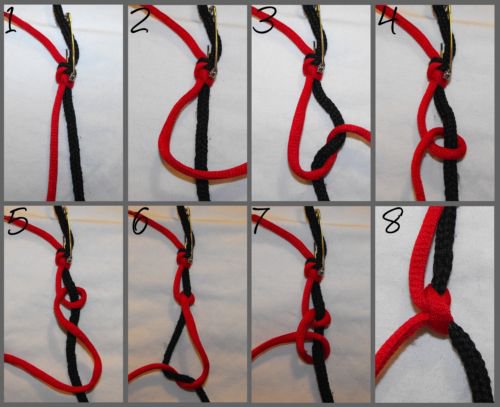
Forward knot
Forward knot is a knot, that to tie to the right(with the left string over the right string). You are using the 'working' string on the left, and tying a knot over the back (right) string. The red string in my working string, and the black is my back string. In these pictures you can see how I'm making a knot with the red string over the black string.
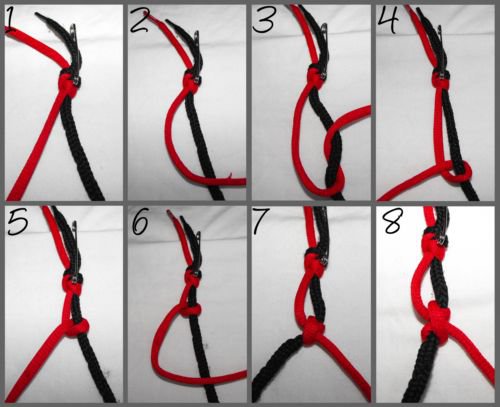
Take the working string to your right hand. The back string to your left hand. The back string need to be stretched slightly.
Put the working string over the back string from left to right, which creates a loop. Then lace through the loop with your working string.
Tighten your knot.
Make the second loop the same way as your first loop and tighten it to your first loop. You have to tighten it so that you can only see the working string. The back string shouldn't be visible.
Your forward knot is now done. It has to be the colour of your working string, and should now be on the right hand side.
The last picture is a detailed picture of the string which isn't tighten so you can see it better.
If you would have more then one back string, you would continue doing this knot with your working string until you finish the full row.
Backward knot
This is a backward knot. You need to Know both forward and backward knots if you wand to do pattern 2 (arrows, chevron).
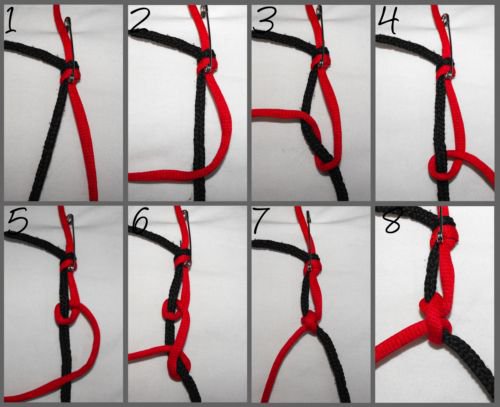
Take the working string to your right hand. The back string to your left hand. The back string need to be stretched slightly.
Put the working string over the back string from right to left, which creates a loop. Then lace through the loop with your working string and tighten it.
Make the second loop the same way as your first loop and tighten it to your first loop. The working string is now on your left hand side.
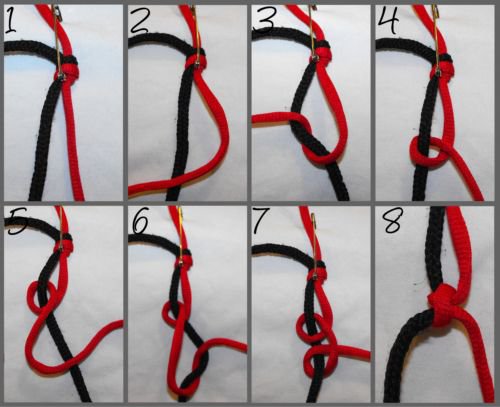
Forward-backward knot
This is a forward backward knot. If you want to do any pattern, you need to know these four knots. It's called a forward-backward knot because when you start tying, your working knot is on your left hand side, but it stays there after you tied the full knot!
Every forward-backward or backward-forward knot is made out of one forward and one backward knot!
The red string is my working string and it's on my left hand side. We make loop to the right. The same way that we do the first loop in the forward knot.
We now make a loop the the left. Now it's a forward-backward knot. The working string is still on our left hand side. It's very simple. It's just a combination of a forward and a backward knot.
You still need to tighten the string as in forward and backward knots and you can't be able to see the back string, only the working string.
Backward-forward knot
With the red string, we make a backward loop around the back (black) string. The red string is now on our left hand side.
We then make a forward loop and it will end up on our right hand side again. and you can't be able to see the back string, only the working string.
We then make a forward loop and it will end up on our right hand side again. and you can't be able to see the back string, only the working string.