Rate Tutorial
Hello and welcome to my tutorial. In this tutorial I will explain how to knot shaped normal patterns that would not be possible to be knotted using the regular shaped normal technique.
I saw a picture by @goldflower on pattern #100674 and got curious how it's made so I asked. Then I kind of forgot about the pattern, but only shortly later I designed the shaped gingerbread man pattern #110933 that @Camo requested in the forum. Camo was also the one requesting a tutorial on it, so here it is!
I saw a picture by @goldflower on pattern #100674 and got curious how it's made so I asked. Then I kind of forgot about the pattern, but only shortly later I designed the shaped gingerbread man pattern #110933 that @Camo requested in the forum. Camo was also the one requesting a tutorial on it, so here it is!
Why is it advanced and how is it different?
In this tutorial I will use patterns #100674 by @Iggy_ , #110933 by me and #111152 by @Etzi as examples to explain the technique. These patterns would not be possible to be knotted using the regular shaped normal technique because of elements that overhang.
When using the regular shaped normal technique, you always hide the unused strings in the edges of the bracelet and you are going to do the same thing in the advanced shaped normal technique. The difference is that to do that successfully in the advanced shaped normal technique you sometimes need to “violate” the rules of segment-knotting by knotting upwards to follow the outline of the shape or accept edges to be horizontal instead of diagonal or perpendicular like you are used to.
Before trying to follow this tutorial, I recommend being familiar with the regular shaped normal technique.
Here are some videos that explain it that I found very helpful.
This video is a bit longer but it shows the process of knotting a more complicated shaped normal pattern and can be useful when you want to take knotting shaped betters a step further.

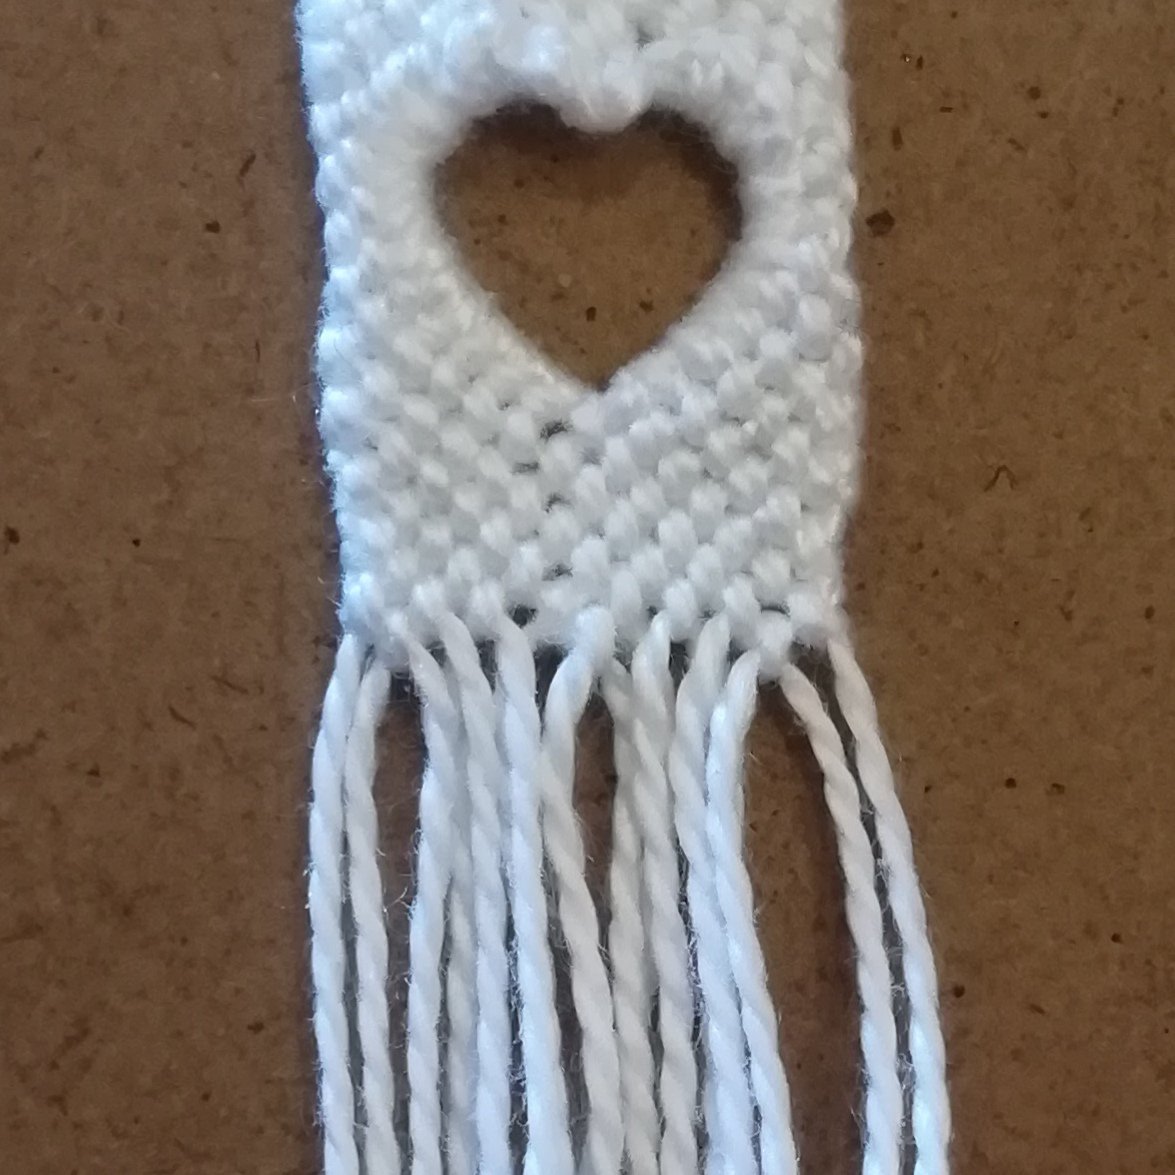
Pattern #100674
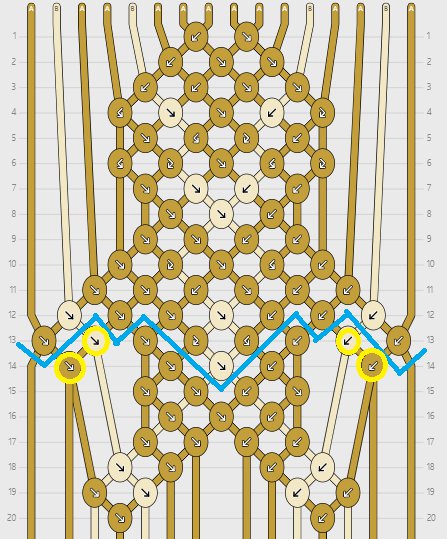
In the picture you can see my annotation of the pattern. I will use it to explain how the pattern is knotted.
As you can see instead of following the candystripe structure of the pattern, I decided to instead knot in a chevron structure because this way it is easier to avoid that the bracelet curves but you can knot it either way. When there are knots between strings of the same colour, you can make any knot you like.
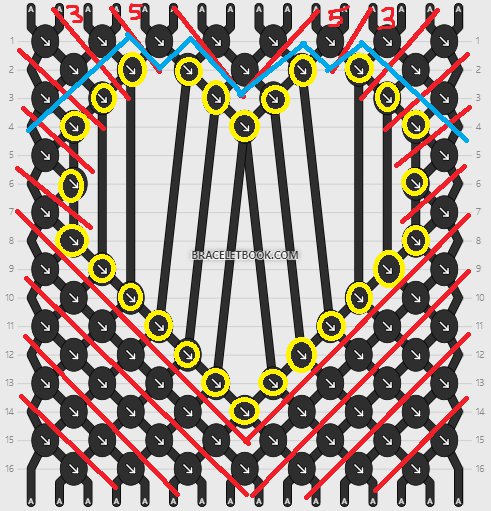
Step 1: Make the knots up towards the edge
The yellow-circled knots represent the knots at the edges. Knot all knots that are possible to be knotted without violating rules of segment-knotting and without knotting any yellow-circled knots. The knots you can knot are the knots above the blue line in the photo.
I wrote red numbers where the pattern is cut off at the top to show how many knots you need to make before stopping when following the chevron knotting structure.
That means after your last full chevron for the next one you only make five knots from either side, for the next one three, then two and then one.
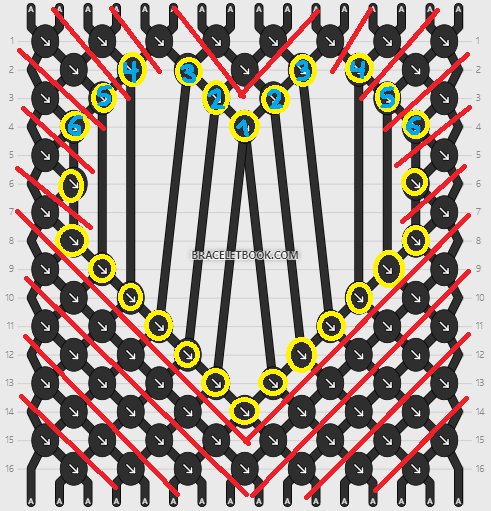
Step 2: Make the edge knots on the top-half
Next, we'll be making the edge knots on the top-half of the heart.

Start by making knot 1.
Make the knots on the left side. I recommend rotating the bracelet like seen in the photo to make knotting easier.
To make knot 2 take the left string of the two middle strings and the string that is left to it. Take the left string and make a fb knot onto the left middle string.
To make knot 3 take the third string and make a fb knot onto the two strings from the previous step.
To make knot 4 take the fourth string and make a fb knot onto the three strings from the previous steps.
To make knot 5 take the fifth string and make a fb knot onto the four strings from the previous steps.
To make knot 6 take the sixth string and make a fb knot onto the five strings from the previous steps.
Then you make the knots on the right side. It's the same as on the left but mirrored. Instead of fb knots you need to do bf knots. I recommend rotating the bracelet like seen in the photo to make knotting easier.
Instead of fb and bf knots you can also do f and b knots, but the edges will be smoother if you do fb and bf knots.
Instead of fb and bf knots you can also do f and b knots, but the edges will be smoother if you do fb and bf knots.
Step 3: Knotting the rest of the pattern
The rest of the pattern can be knotted using the regular shaped bracelet technique. I again recommend to make fb knots for the yellow-circled knots and bf knots on the right.
First you need to make the knots in row 5 and 6.
First you need to make the knots in row 5 and 6.
Then you make the knots at the bottom edge of the heart.
After you finished the lower edge of the heart, you knot several complete chevrons before going back to step 1 again. The pattern asks for 2 chevrons, but I did 3 to give some more space.
After you finished the lower edge of the heart, you knot several complete chevrons before going back to step 1 again. The pattern asks for 2 chevrons, but I did 3 to give some more space.
The next two patterns will only be described very briefly.
Pattern #110933:
In this pattern there are four knots where you have to use the advanced shaped normal technique. The knots that are affected are again circled.
Step 1: Make the knots up towards the edge
Make all the knots above the blue line. You will need to use the regular shaped normal technique for the edges. I recommend using bf knots on the left edge and fb knots on the right edge, but you can also use f or b knots like indicated in the pattern.
Step 2: Make the yellow-circled knots
On both sides, first make the bottom yellow-circled knot and then the top yellow-circled knot. I recommend bf knots on the left side and fb knots on the right side.
Step 3: Knotting the rest of the pattern
The rest of the pattern can be knotted using the regular shaped normal technique.
For the legs I recommend knotting them as long as possible and not as indicated in the pattern.
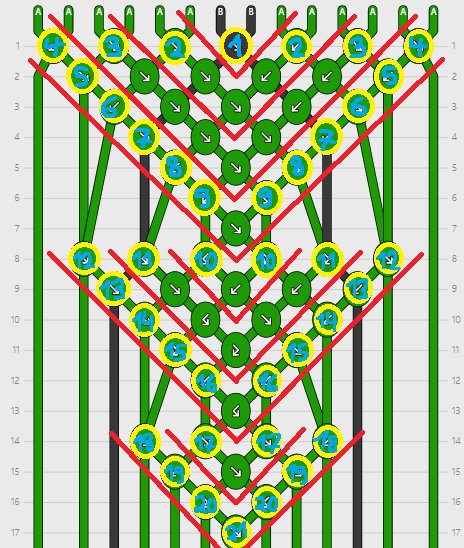
Pattern #111152
Here is my annotation of the first half of the pattern.
To start knotting the pattern I recommend making one or more square knots around all strings using the strings of colour B. This way you have all the strings in one place. If you don't knot how, check out the "Advanced Knots Tutorial".
I have circled all the edge knots and given them numbers. In these edge knots you hide the unused strings. (In knot 1 that does not seem to be possible; for knot 21 I recommend making a square knot to hide the strings in just one knot)
The order in which you knot this pattern is the following: you knot the yellow-circled knots number by number and in-between you knot the corresponding segments marked by red vs.
For all the yellow-circled knots I recommend making bf or fb knots where possible to create a smoother edge. In these yellow-circled knots you hide all the strings that are unused at that point of knotting the pattern.
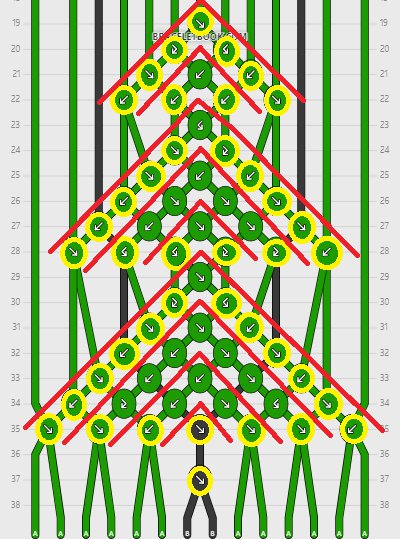
Here is my annotation of knotting the second half of the pattern. I think the second half would be lovely as a keychain.