Rate Tutorial
Reading normal patterns is not too hard to do! There are several symbols and things that I will explain below that will help you understand visually how to read them. You will learn what each of the knots look like in a pattern and how to do them as well as what makes up a normal friendship bracelet pattern. For this tutorial I am using pattern #24441 because it has all 4 knots of a friendship bracelet pattern.
The 4 types of knots
- There are 4 types of knots in a pattern that I will mention and so I will explain how to make the knots first.
- The four knots consist of a forward knot, a backward knot, a forward, backward knot and a backward forward knot.
- Each knot will have 2 halves.
- The four knots consist of a forward knot, a backward knot, a forward, backward knot and a backward forward knot.
- Each knot will have 2 halves.
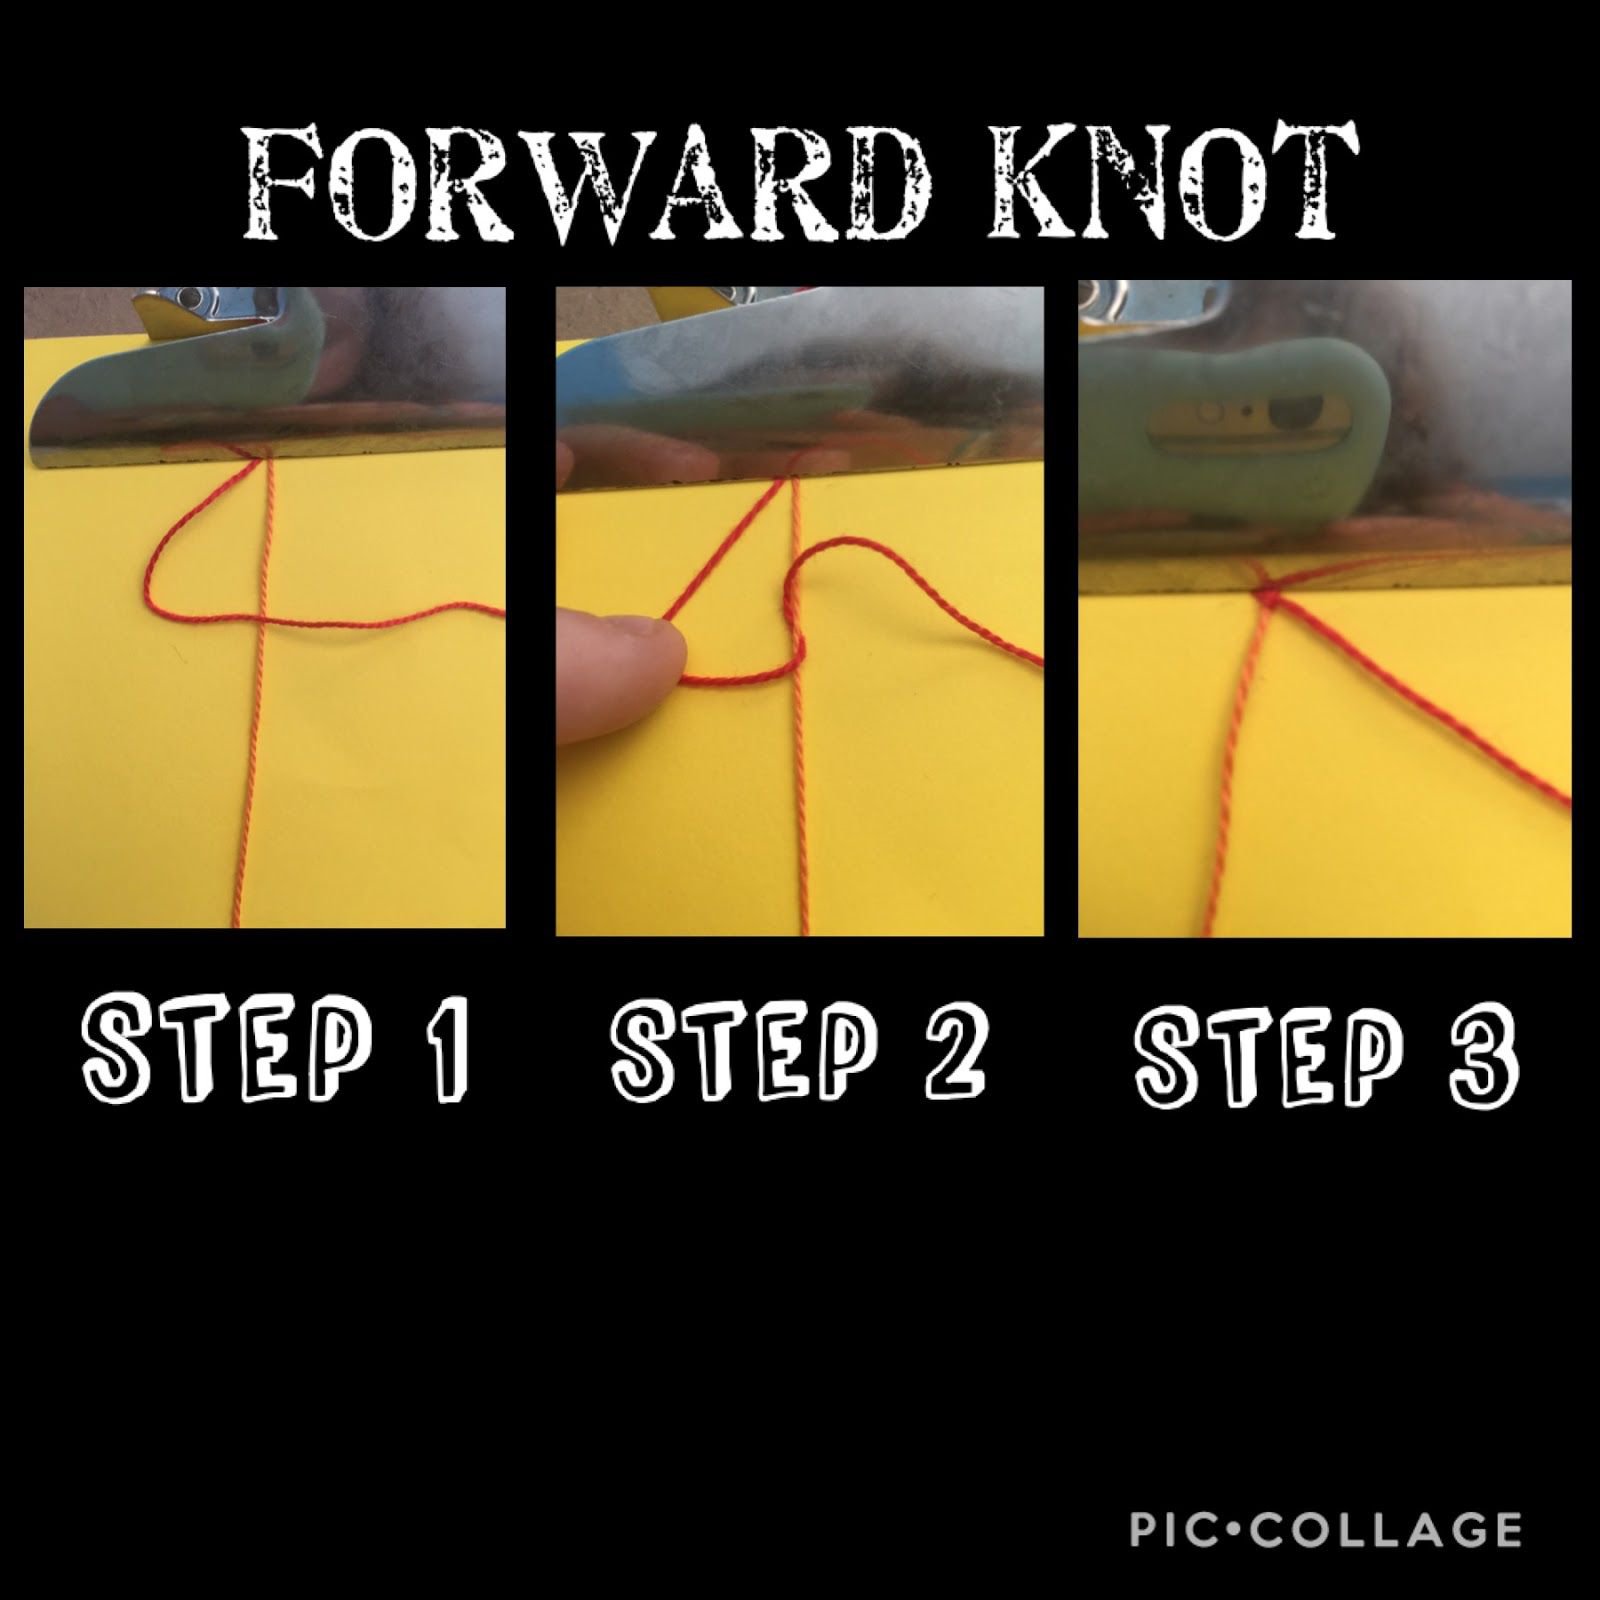
Forward knot
The forward knot can be found in most patterns other than 1212 patterns (which are patterns mainly with forward backward knots and backward forward knots).
Step 1
The first step in making this knot is to take the string on the left that you are tying your knot with and placing it over the string you are making the knot onto.
Step 2
The second part of making this knot is taking the end of the string you are tying the knot with and going under the other string and pulling up as shown in photo 2 of the collage.
Step 3
The last part of a forward knot is doing the first 2 steps once more to make 2 halves of a knot. So using the red string I made two halves onto the orange string. Once your knot is done the string you knotted with goes to the right of the string you knotted onto.

Backward knot
The backward knot is the exact opposite of a forward knot.
Step 1
In photo 1 you can see that to make the backward knot you place the string from the right that you are tying your knot with over the string you are making the knot onto. It will look like a backwards 4 hence the name.
Step 2
You will now take your string that you are making the knot with and go under the string being knotted onto and pull up.
Step 3
Repeat steps 1 and 2 once more to complete your backward knot. The string then goes to the left of the string you knotted onto.
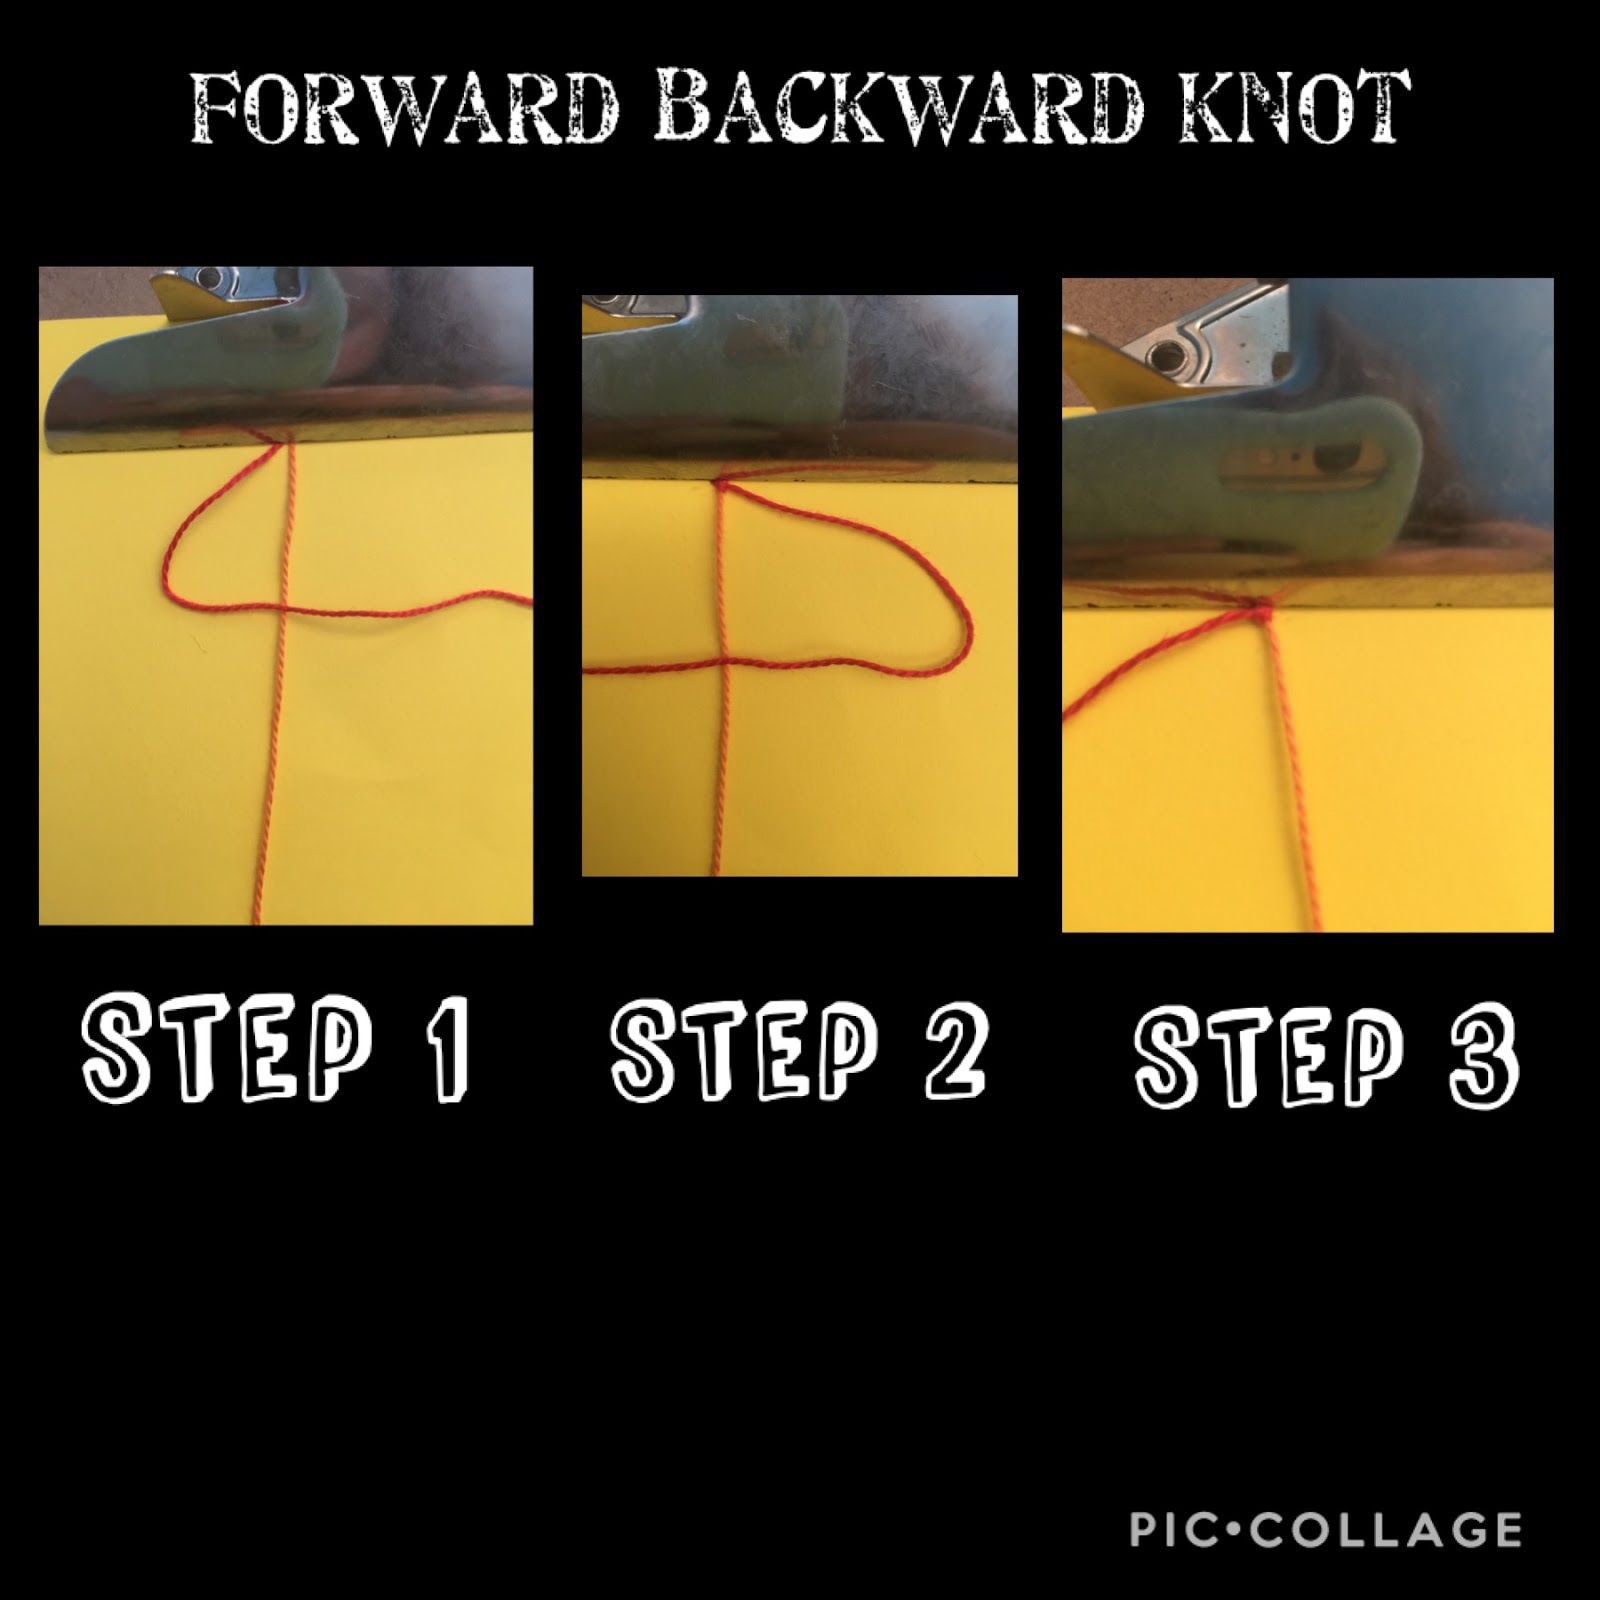
Forward backward knot
To do a forward backward knot you need to be able to make a forward knot and a backward knot. I’m not explaining the whole process of a forward knot/backward knot, again for this section so see the above for more details.
Step 1
Make one half of a forward knot.
Step 2
Make one half of a backwards knot.
Step 3
Place your string that you knotted with to the left of the string you knotted onto.

Backward forward knot
Again for this knot just like the forward backward knot you need to know how to make a forward knot and a backward knot. See the forward and backward knot pictures/section for more details.
Step 1
Make one half of a backward knot.
Step 2
Make one half of a forward knot.
Step 3
Place your string that you knotted with to the right of the string you knotted onto.

The symbols
- Above are the knots you will see in a pattern, you will know which knot to make based on which direction the arrow is pointing.
- The colour of the circle states which colour your knot will be so if it is a red circle then you will be making a red knot. If the circle is green then your knot will be green.
- Before a forward knot the string you are knotting with will be to the left of the string you are tying onto and after making your knot it will go to the right.
- When you make a backward knot the string you are tying your knot with will be to the right at first and will go to the left once you make the knot.
- When you make a forward backwards knot the string will be coming from the left at first and will go back to the left after the knot is made.
- And lastly when you make a backwards forwards knot the string will be on the right when you start the knot and will be on the right when you are done with the knot.

Patterns
- Each pattern will have a grid version on top and the bottom version that shows the knots like above. Most people follow the bottom pattern but the top one helps see what the pattern will look like.
- When you read patterns as this tutorial is explaining you can either choose to segment knot or knot row by row. Segment knotting is knotting diagonally in segments instead of horizontally but there are plenty of tutorials out there that are good for learning to segment knot.
- When you read patterns as this tutorial is explaining you can either choose to segment knot or knot row by row. Segment knotting is knotting diagonally in segments instead of horizontally but there are plenty of tutorials out there that are good for learning to segment knot.
Rows
- In the above photo you can see numbers on the sides that show which row is which and so you can tell which knot is in which row because there are small grey lines going through the rows.
- These lines are horizontal and are helpful for when you do the row by row method (which isn’t segment knotting) when you will need to follow the knots on the grey lines.
- To start the row by row method you will order the strings based on the strings sticking out on the top which is mentioned down below. In the first row of the pattern shown above the first knot will be a forward backward black knot, the second knot will be a backward knot, the third knot will be a forward knot.
- The grey lines can be seen between the circles horizontally to distinguish which row is which.
The lines connecting the knots
- As you can see there are lines connecting the circles with different colours. These lines show which direction each string goes after each knot but mainly helps when you decide to cut a pattern for a teardrop loop/triangle end so you can tell which order your strings go in with these lines.
- The colours also show which string goes in that direction after every knot but if you knot and the string goes in the proper direction (as in you haven’t made any mistakes) after every knot you won’t need to check the colours (the direction before/after every knot is mentioned above).
- The colours also show which string goes in that direction after every knot but if you knot and the string goes in the proper direction (as in you haven’t made any mistakes) after every knot you won’t need to check the colours (the direction before/after every knot is mentioned above).
The letters on the top and bottom
- The letters on the top and bottom represent the different strings and what order they go in if you go row by row when you start.
- The letters are also on the string at the bottom so you can check that they are in the correct order once you have completed the pattern once. If there are 2 of 1 colour then 2 of the strings will have the same letter on them.
- These letters can also be helpful when you want to decide to make a loop or not because that way the strings at the top will show you if there is an even amount of strings for every colour or not (although you can do a loop with even or uneven amounts). It will be pretty helpful to have the strings at the top even if you are segment knotting.
Tutorial for the pattern shown.
And that is it! There are so many different video tutorials out there but these are the things that they should all include so now you have a written version to follow that way if you forget you can always look back at this! If you have any questions feel free to leave them in the comments or message me. Hope this helps you all and have a great day! 😇