Finished 1/4/2026! This is a late Christmas gift for a friend of mine who has a grey cat named Percy. Hoo boy, I think this is my first shaped piece? Huge learning process. I liked how @Orca made the ears distinct, so I spent a while brainstorming how to get the same result without having to use two jump rings. I figured it out late at night and wrote myself instructions so I could do it the next morning lol. I cleaned up the instructions to make it more comprehensible to anyone who might like to try:
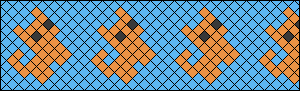
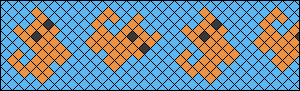
This pattern uses 12 strings, so we'll be dealing with 6 strings to make each ear. For one ear: cut 3 strings twice as long as the pattern; these will be doubled up and give you 6 strings. (If making on a keychain or starting on some kind of finding) Drape your 3 doubly long strings over your keyring/finding, and make sure there is an even length of string on both sides. Hold 1 string separate, and treat the rest of the bundle (5 strings) as one string. Make the first knot over the whole bundle. Proceed until you get to row 3. Repeat the process (drape 3 doubly long strings over keyring/finding, making sure there's an even length on both sides. Use 1 string to make a knot over the bundle of 5 strings. Tie until you get to row 3.) and unite the ears by tying the center knot in row 4. Then proceed to knot the rest of the pattern.
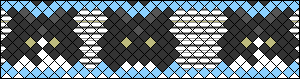
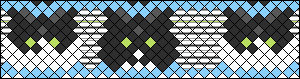
For me, knotting the head was easy and probably the most fun part because it came together quickly. I did struggle around the lower part of the face, as you can see my knots are a little loose, but I don't have too much a problem with it since it ended up symmetrical. On the back of the head, it makes this nice reverse chevron pattern. The body is where I deviated from the pattern; instead of making all forward knots, I made forward knots on the right side and backward knots on the left to keep getting that reverse chevron on the backside. I stopped at row 17 and set this project aside for a few days. Coming back was probably the hardest part of this whole thing because I had a hard time figuring out the order of my strings, because they're all the same color and the string is kinda janky so the last row of knots I did came loose so I had to go through and tighten some of them and then figure out the string order and AAHHHH @_@ made me crazy. But then I got it ^_^ Tapering the body was fun, I really like shaped patterns! And then on the tail I just made macrame square knots like the other pictures. After I made the tail as long as I wanted, I took one of the interior strings and pulled it tight to try to give it some shape, and I think it worked. Then to really secure the ending, I used one of the strings I was tying the square knots with to make a barrel knot. And then because I expect this keychain to get thrashed and I wanted to secure it even more, I split the bundle of interior strings into 5 and 5 and then used the strings that I tied the square knots with to make a rain knot. I could have done this on the outside, but I wanted to hide it to make it look cleaner.
Oh, and I used a cheap nail file to sand down the sharp part of the soda tab where it connected to the can, and the two little points on the outside where you pop it up. I know those aren't too sharp, but I didn't want it to snag on the strings. This isn't the first project I've started on a soda tab, but it is the first one I've finished. Inspired by @Julie798 's picture on pattern #147891.
This pattern tickled my brain, I want to try so many different variations! I'll definitely be coming back to make this again for other cat parents in my life!