Rate Tutorial
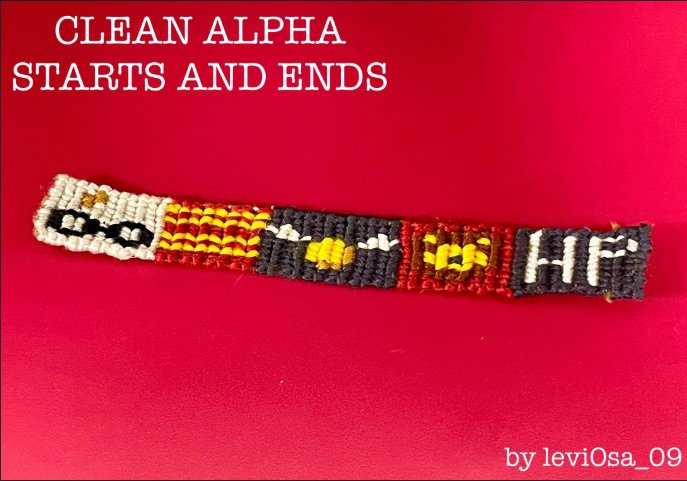
Introduction:
Hello! In this tutorial, I am going to show you how to do a clean start and end to an alpha, with no other materials required!
Video:
If you are a visual learner here’s a video that shows you exactly how to do these techniques!

To use these techniques, you will need to be able to do these skills:
- Larks Heads Knots
- Forward Knots
- Backwards Knots
- Straight Edge Alpha Technique (Optional but recommended. I use this technique.)
- Larks Heads Knots
- Forward Knots
- Backwards Knots
- Straight Edge Alpha Technique (Optional but recommended. I use this technique.)

Pick your pattern. I chose to use pattern #135050.
If you are using the clean start technique, then your chosen pattern must:
- have an even amount of base strings
- the first row is highly recommended to be all one color
- it cannot start as shaped
If your pattern has an odd amount of strings, it can potentially still work, if you tie at least the first two rows with an even amount of strings. (I noticed too late - my pattern has 11 base strings, so after the first three rows I combined two strings into one. It is a little bit thicker at the top, but will not be too noticeable!)

Starts: Step 1
Tie your larks head knots on a piece of scrap string. I call this the “anchor string.” To keep the scrap string tight, I use a clipboard, with a large binder clip on the opposite side to keep it tight.

Starts: Step 2 and 3
Start knotting your creation. Using the straight edge technique or not should not change it too much. When starting tying your first knot, here’s a tip to secure the loose end of your leading string (I call this a “tail”):
Tie your first knot (can be a forward knot or a backward-forward knot, if you are using the straight edge technique as well, like I am).
⭐️ Bonus Tip! ⭐️ (Step 3)
Once you have done your first few rows, minus the last knot on the second row, you can secure the tail. Tie the next knot on that base string over both the base string and the tail to secure it and hide it. Once the tail is secured under the knot, you can continue knotting like normal and cut the tail out later, or you can continue knotting on both the base string and the tail.

Starts: Step 4
Tie your next few rows. I recommend doing at least 4 rows, but no more than 6 rows.
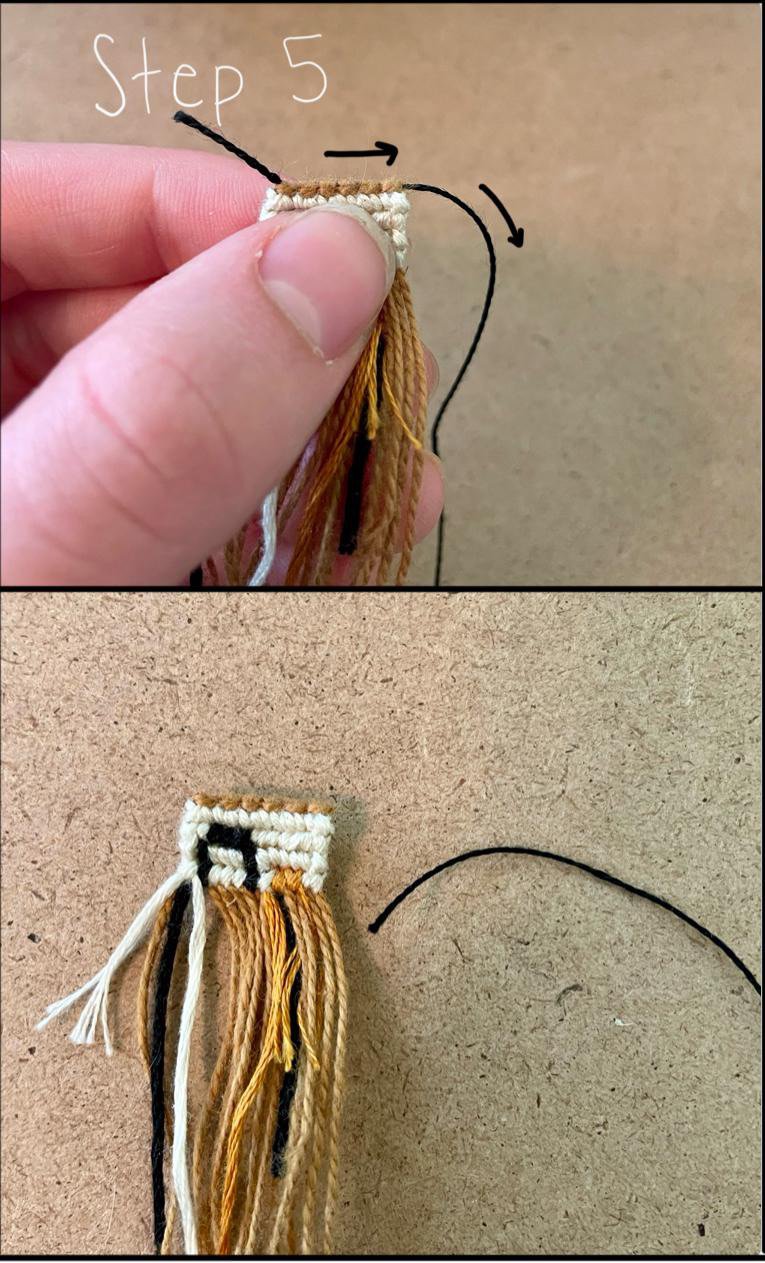
Starts: Step 5
Holding the knotted section tightly, carefully pull out your anchor string, leaving the larks head knots and the base strings.

Starts: Step 6
Open up the larks head knots into loops. I use either my fingers or a blunt needle. (See 1:17-1:28 in the above video for how to do it with your fingers.)

Starts: Step 7
Hold the knotted section tightly and carefully pull the base strings through one at a time to create your flat start! Don’t pull too hard.
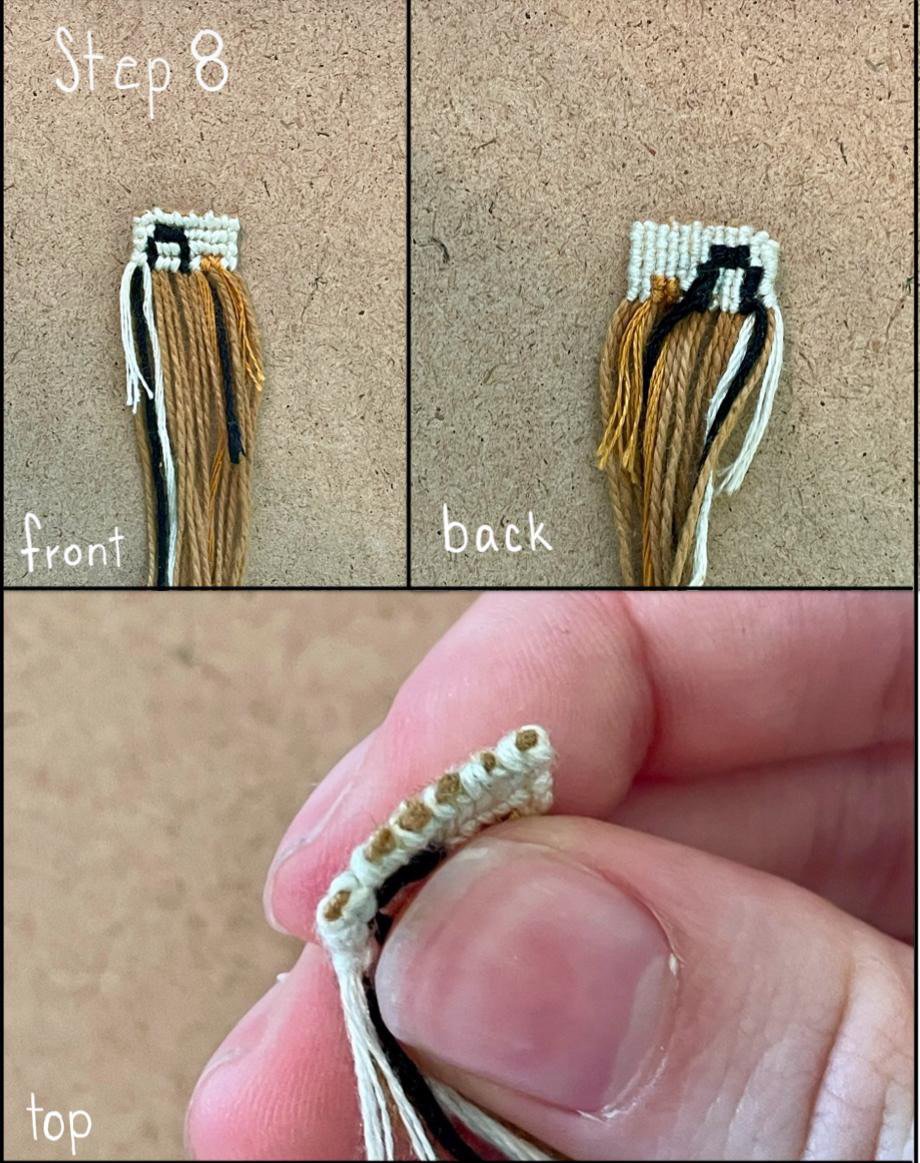
Starts: Step 8
Congratulations! You have finished a flat start! There is no glue or anything needed to secure the strings, unless you have a “tail” hanging from where you started a leading string.

Ends: Step 1
Leave three rows left untied on your creation to start this technique, then flip your creation over to the back.

Ends: Step 2
Loop your first base string behind itself - your base strings will need to be a little bit longer than the length of your intended creation. If it is hard to hold the string and tie a knot, I would suggest using tape to secure them. For this picture, I used the clipboard clip to secure it, but while I actually knot, I will use tape or just my fingers.

Ends: Step 3
Flip back over to the front and secure your creation once more. Tie a knot around both halves of the folded base string.
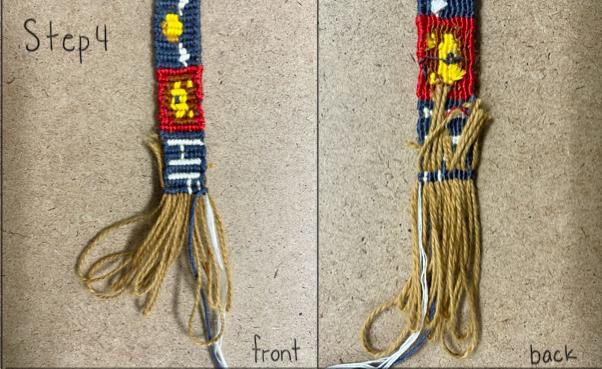
Ends: Step 4
Continue doing this across the entire row. The back of your creation should look somewhat like this.

Ends: Step 5
Complete a second row, also tying on both halves of the base string.

Ends: Step 6
This should be your last row of your pattern. The knots of this row are tied *only* on the original base string. This might be a little tricky, especially if you’re knotting with a bobbin. I had to cut the leading string so I could easily pull it through the knot, as my loops were too small to fit my bobbin in it.
You may need to do some slight tugging on each half of the base string to figure out which is the original! Make sure to NOT pull the loop out!
You may need to do some slight tugging on each half of the base string to figure out which is the original! Make sure to NOT pull the loop out!

Ends: Step 7
Once this row is done, flip your creation over to the back. It should look something like mine. Trim your leading string to be an inch or less (2.5cm or less).

Ends: Step 8
Carefully pull each base string end until there is no loop and the edge is flat.

Ends: Step 9
When you are on your last few loops, tuck your leading string - the one that was tying the knots - through the loops before you pull them tight. This will secure the string so it doesn’t come out. Pull the last strings through, then you can trim the little tail that sticks out.

Ends: Step 10
This is what your creation should look like from the back once all base strings are pulled through. Tighten each one to make sure they are secure.

Ends: Step 11
Trim all of the base string ends as tight as you can without trimming the creation. Congratulations! 🎉 You have completed a flat end! If you are worried it might come out, you can put a dot of clear glue or nail polish to seal it. I use mod podge, a glue/sealer/finish, but it sometimes is a little stiff and hard.

Thank you so much for reading my tutorial, and I hope you enjoyed it! If you have any questions, leave a comment below or message me! Happy knotting! 🧶